Updates from April, 2019 Toggle Comment Threads | Keyboard Shortcuts

  • Anıl Akduygu 15:28 on 23 April 2019 Permalink | Reply
    Tags: , , , , , database conection, fetchall, fetchone, , , python modules, SELECT, SQL statement, tabulate,   

    Python Database  API Specification for Oracle Database – II 

    This is my third note about about Python Database  API Specification for Oracle Database. In my last note; I showed how you can connect to Oracle database in detail.

    https://yusufanilakduygu.wordpress.com/2019/04/14/python-database-api-specification-for-oracle-database-i/

    In this note; I will show you how you can execute SELECT statement and fetch data from Oracle database in Python.

    In order to execute an SQL statement in Python; you need to create a cursor object from a database connection. After creating a cursor ; you can execute many statements; These statements can ben DDL or DML. All statements are executed with execute() function. Simply at least one time you should call execute() function. But for the SELECT statement you have to call fetch statements once or many  time after execute() function.

    Now Let’s look at cursor functions.

    cx_Oracle.Cursor.parse() this is an optional function to check the correctness of the SQL statement.

    cx_Oracle.Cursor.execute() : This function can be used for to execute a SQL statement

    If you are executing a SELECT statement; you should call fetch functions additionally which are given below

    cx_Oracle.Cursor.fetchall() : This function can be used for fetching all records from the SQL query

    cx_Oracle.Cursor.fetchmany() : This function fetches the next rows_no rows from the database

    cx_Oracle.Cursor.fetchone(): This function fetches a single tuple from the database.

    Now I will explain how you can execute SELECT  statement and fetch query results in Python.

    First;  you need to create a cursor object with cursor() function from a database connection like below.

    import cx_Oracle
    db_con=cx_Oracle.connect(‘scott/oracle@192.168.56.100:1521/DB3’)
    cur=db_con.cursor()

    After creating your cursor object; you can run the SELECT statement and fetch the query result. The query results are put into the list object. The cursor that you created simply points this list object; and the all data can be fetched with a simple loop like the below sample

    import cx_Oracle
    db_con=cx_Oracle.connect(‘scott/oracle@192.168.56.100:1521/DB3’)
    cur=db_con.cursor()
    query=’Select * from emp’
    cur.execute(query)
    for x in cur:
        print(x)
    cur.close()

    Now run this sample and look at the result.

    python2.JPG

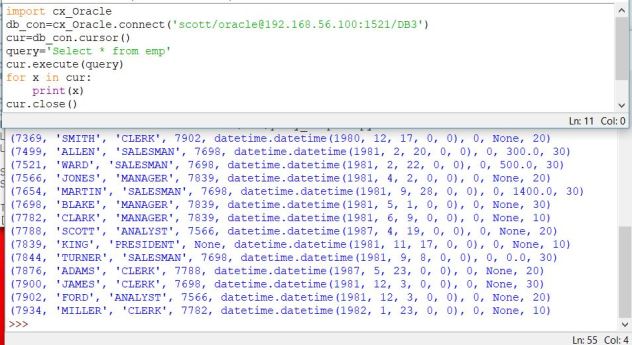
    As you see; printing query result with the print statement is not a good option. Therefore ; I will advice you to use tabulate module to format the query result easily.

    you can install the tabulate module  with the below command.

    pip install tabulate

    python1.JPG

    At the below example you will see the usage of fetchall() function  and tabulate module. Tabulate module can be called from the print function.

    from tabulate import tabulate
    import cx_Oracle
    db_con=cx_Oracle.connect(‘scott/oracle@192.168.56.100:1521/DB3’)
    cur=db_con.cursor()
    query=’Select * from emp’
    ret=cur.execute(query)
    result=cur.fetchall()
    header=[‘EMPNO’,’ENAME’,’JOB’,’MGR’,’HIREDATE’,’SAL’,’COMM’,’DEPT’]
    print(tabulate(result,header,tablefmt=”grid”))

    python2.JPG

    Another example is the use of fetchone() function. By this function you can fetch the query result one by one.

    import cx_Oracle
    db_con=cx_Oracle.connect(‘scott/oracle@192.168.56.100:1521/DB3′)
    cur=db_con.cursor()
    query=’Select * from emp’
    cur.execute(query)
    row=cur.fetchone()
    print(row)
    row=cur.fetchone()
    print(row)

    python2.JPG

    In the next notes; I will show you how you can use bind variables in SQL statements. I hope that this note will be helpful for you to understand the SQL statement usage in Python.

    Anıl Akduygu

    Istanbul

     
    • SRKN 19:39 on 23 April 2019 Permalink | Reply

      Hi Anıl,
      You’re the best DBSEC pro that I’ve seen ever.
      Thank you for good shares.
      Regards

      Like

  • Anıl Akduygu 13:20 on 14 April 2019 Permalink | Reply
    Tags: , , connect(), connection Objects, , , , makedns(), modules, , , programming, , ,   

    Python Database  API Specification for Oracle Database – I 


    In this note I will show you how you can make Oracle database operations with Python. In order to write database programs in Python you need cx_Oracle module.  In the below note I already explained how you can install cx_Oracle into Python environment. If you do not know this subject you can read this first.

    https://yusufanilakduygu.wordpress.com/2017/06/24/connect-oracle-from-python-in-windows/

    First you should know that; cx_Oracle Python module completely consistent with Python Database API Specification v2.0. It means that; In Python you can make all database operation by the same interfaces. It does not matter what type of database are you using.

    If you want to read full Python Database  API Specification you should visit below site.

    https://www.python.org/dev/peps/pep-0249/

    In this note ; I will show you how you can can make connection to Oracle database by cx_Oracle module.

    Connecting to Oracle Database

    In cx_Oracle module we use connect() function to connect to Oracle database. This connect module creates a connection object. From this object you can create a cursor object to make database operations. First you need to create a connection object like the below program. In the first connection ; we use tns entry in your tnsnames.ora file. At the other connection; we use easy connection method by directly giving ; Server , port and Service Nane specification.

    Capture.JPG
    Other method to connect to Oracle database is to create your tns entry by using makedns() function, after creating your tns entry, you can use it in connect() function .
    Capture.JPG
    When a problem occurs during database operation, Python uses very rich exception model. One of the exception is DatabaseError . This exception is fired when an error is occurred during database operations. It can be handled like below.
    Without exception handling in your database ; your code is stopped by given such a message
    Capture.JPG

    Now ; At the below code we handled the database exception

    Capture.JPG
    When you run this program; you can manage database error ;
    Capture.JPG
    Connection Object responds the following methods
    .close() –> close the connection
    .commit() –> commits transactions at the database
    .rollback() –> rollbacks transactions at the database
    .cursor()  –> returns a cursor to make operations ( DDL or DML ) on the database
    I hope that; this note helped you to write database codes in Python.
    At the next  notes; I will explain how you can make DDL or DML operations by cursor objects.
    Y. Anıl Akduygu
    Istanbul.


    Full Database codes are given at the Github


  • Anıl Akduygu 21:16 on 4 April 2019 Permalink | Reply
    Tags: , , , , , Oracle Linux 7.5, Oracle VM Virtualbox, , unix,   

    Installing Oracle Linux 7.5 on Oracle VirtualBox 

    In this note I will show you how you can install Oracle Linux 7.5 on Oracle  VM Virtual Box. First start with how to download ISO image of Oracle Linux 7.5

    You can download ISO image from http://www.oracle.com/linux web page.

    1.jpg

    from then you should sign in Oracle delivery cloud.

    2.JPG

    to  find Oracle Linux image, choose Release and write down “Oracle Linux” to the search text field and then press Search button.

    3.JPG

    Now you can add Oracle Linux 7.5. to your chart or If you want , you can choose Oracle Linux 7.6 . But I always prefer one version below the latest version .

    4.jpg

    Choose x86 64 bit for the Platform/languages field and press Continue.

    5.jpg  Accept the License Agreement

    6.JPG

    As you see ; In the download page  there are many ISO images , the key point is to select the ISO which is pointed in the below picture. That image is enough for you to install Oracle Linux  and press Download.

    7.jpg

    After then , Download Manager starts automatically, If you installed it already. Otherwise you have to install it.

    8.JPG

    As you see,  Downloading takes some time.

    9.JPG

    Now; We completed the downloading phase of the image file and now we will crate a empty Linux machine on Oracle VM VirtualBox by clicking New Button . In the picture you can see all my virtual machines as well.


    35.JPG

    And the key point is Choose machine Type : Linux

    10.JPG

    Choose memory size

    11.JPG

    Choose Hard Disk type

    12.JPG

    Choose hard disk file type

    13.JPG

    May be in the future, you will need disk space therefore choose dynamically allocated hard disk type

    14.JPG

    Choose initial disk size; but this space will not be allocated right now.

    15.JPG

    Now ; We created a empty linux machine and we will install Oracle Linux from the downloaded ISO image. Plug this ISO image to optical drive in the storage setting.

    16.JPG

    And before starting the machine,   do not forget to choose USB Tablet as a pointing device ,If you use a USB mouse with your computer, otherwise you can not use your mouse during installation. Simply Select USB Tablet as Pointing Device in the System setting like below.

    Capture.JPG


    Now start the machine for the installation

    17.JPG

    Now Follow the installation by clicking Next

    during the installation , one important point is to Select the right Software Selection . Click the Software Selection

    22.JPG

    Choose Server with GUI and some add-Ons as in the below picture.

    20.JPG

    Choose Installation destination as below

    21.JPG

    And enter password for the root password

    23.JPG

    Just click next to other selections and your Oracle Linux machine will ready.

    After first reboot to your machine, do not forget to install Guest Additions CD.

    Untitled.jpg

    I hope that; this note will help you to install Oracle Linux 7.5.

    Anıl Akduygu


c
Compose new post
j
Next post/Next comment
k
Previous post/Previous comment
r
Reply
e
Edit
o
Show/Hide comments
t
Go to top
l
Go to login
h
Show/Hide help
shift + esc
Cancel