Updates from March, 2019 Toggle Comment Threads | Keyboard Shortcuts

  • Anıl Akduygu 21:01 on 26 March 2019 Permalink | Reply
    Tags: , Dynamic Data Masking, hiding data, , , sevsitive data, SQL Server, SQL Server 2017, windows server   

    Dynamic Data Masking in SQL Server 2017 

    Dynamic Data Masking ( DDM) masks the selected column data during query execution. Simply masking is applied to the query results. DDM  hides sensitive data from a central location. For example you can hide some portion of credit card information or whole maiden surname information from the users.

    Actually DDM is not a full solution to secure sensitive data in the database. Because It is possible for malicious users to guess the masked date by running some special queries like below.

    Select Customer_id, salary from Employee where Salary=1000;

    Select Customer_id, salary from Employee where Salary=1001;

    Select Customer_id, salary from Employee where Salary=1002;

    In that case; we should audit the database to find such attacks.

    There are four type of masks  available

    Default Masking : This is Full masking . For strings it uses XXXX and for number it uses 0 to mask data values.   For example;

    ALTER COLUMN  MaidenSurname  ADD MASKED WITH (FUNCTION = ‘default()’)

    Email Masking : This method  of masking masks first letter of email address like below;

    fXXXX@XXXX.com

    ALTER COLUMN  Email  ADD MASKED WITH (FUNCTION = ’email()’)

    Random Masking; Randomly masks any numeric data within specified range

    ALTER COLUMN  Salary  ADD MASKED WITH (FUNCTION = ‘random(1, 12)’)

    Custom String:  It masks some portion of the data by  padding string in the middle.

    ALTER COLUMN  Customer_surname  ADD MASKED WITH (FUNCTION = ‘partial(1,”XXXXXXX”,0)’)

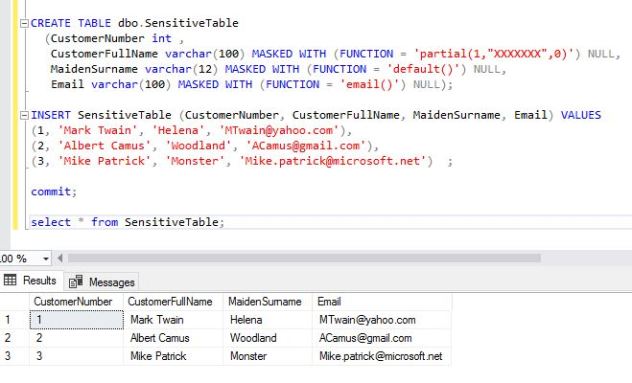
    Now I will give you an example ; In this example I will create a table with masked columns, and then after adding some rows into  this table we will query the table and check the results.

    Let’s create the table in my Sample01 database. In this table we created three masked columns and selected the table with the user sa. This user  has sysadmin privilege therefore It can see the value of masked  columns.


    1.JPG

    Normal user with the the select privilege of this table can not see the value of  masked columns as you see in the below picture.

    2.JPG

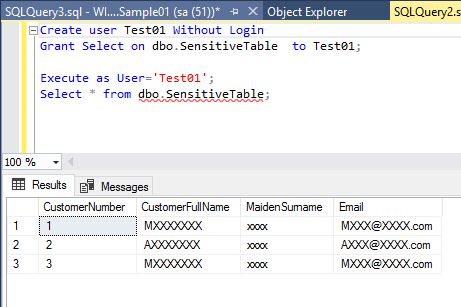
    Only the user with UNMASK privilege can see the value of masked columns.

    3.JPG

    In order to  select the definitions of masked column  information we should query sys.masked_columns  view by joining sys.tables views.

    SELECT a.name,
    b.name,
    a.is_masked,
    a.masking_function
    FROM sys.masked_columns a,
    sys.tables b
    WHERE a.object_id = b.object_id
    AND a.is_masked = 1;

    In order to drop the definition of masking column we use  ALTER TABLE command .

    4.JPG

    If you want ; you can change the masking type of a column with ALTER TABLE command.

    6.JPG

    I think that ; this note should be a good starting point for you to learn DDM in SQL Server 2017.

    Y. Anil Akduygu


    • Adem 14:12 on 27 March 2019 Permalink | Reply

      Thanks for sharing, it is very clear and helpful 🙂

      Like

  • Anıl Akduygu 18:38 on 16 March 2019 Permalink | Reply
    Tags: , , dbsat ver 2, , , , ,   

    Oracle Database Security Assessment Tool DBSAT ( ver 2.0.1) 

    DBSAT is a security assessment tool which is developed to check database security configuration, security policies, users and database privileges. At december 2017 Oracle  released the new version of DBSAT ( ver 2.0.1) which includes a new component to identify sensitive data in the database. This part is called Discoverer.

    In this note; you will find a complete explanation about DBSAT ver 2.0.1.  I will show you how you can install this product and how you can get the security reports to find the vulnerabilities in your databases.

    DBSAT has three different components which are;

    Collector: This component runs only on the database server. It runs SQL queries and operating system commands to collect data about the databases. This component produces a special JSON file which is used for the other component ( the Reporter ) to produce the security assessment report of the database. Collector runs on all Solaris, Linux , Windows, IBM AIX and HP –UX versions , but OS data collection does not run on Windows systems.

    You can use data collector on Oracle 10.2.0.5 and laters.

     Reporter: This component reads the file which is produced by the collector and generates the database security assessment report. You do not need to run the reporter on the database server. This component can run on any windows client. For the reporter only Python 2.6 and later is required.

    The Discoverer: This is the new component in version 2.0.1. The discoverer finds sensitive data in the database according to the configuration files. The discoverer requires JavaRuntime environment 1.6 or later.

    The Installation and the use of DBSAT

    You can download DBSAT from the below metalink note

    Oracle Database Security Assessment Tool (DBSAT) (Doc ID 2138254.1)

    I download dbsat.zip file to the database server which runs Oracle 12.1

    Create a directory /home/oracle/dbsat; put the dbsat.zip to this directory and unzip it( Picture-1).

    picture-1.JPG

    After unzipping the dbsat.zip file you should have the below files and directories (Picture-2)picture-2.JPG

    (Picture-2)

    At my environment I have a database which is called DB3. Now I will run the collector with system user and dbsat will generates all files to /home/oracle/DB3_file directory ( Picture-3).picture-3.JPG

    (picture-3)

    The general syntax for the collector is

    ./dbsat collect  connect_string   destination_directory

    After the the collector runs, It produces a zipped file and you have to enter a password for this zipped file ( if you do not use –n option in the collect command) ( Picture-4).

    picture-4.JPG

    (Picture-4)

    Now It is the time to start the Reporter to produce Security Assessment report for the database (Picture -5 )

    Simply you can run the reporter with the below command

    $ dbsat reporter zipped_file_name

    Actually the reporter component has many features, If you want to learn all syntax of the reporter, you have look at the DBSAT documentation

    http://www.oracle.com/technetwork/database/security/dbsat/documentation/index.html

    picture-5.JPG

    (Picture – 5)

    In order to open the file which is produced by the collector you have to enter the correct password.

    Now check the dbsat directory to see the created reports ( Picture -6). As you see; the security Assessment report is produced in four different formats.


    picture-6.JPG

    (Picture -6 )

    If you want to the read the Security Assessment report in html format; you can open it in any html browser ( Picture-7).

    picture-7.JPG

    (Picture -7)

    And the same report in text format is given in Picture -8.

    picture-8.JPG

    (Picture-8)

    Now; we can look at the new features of the dbsat ; This is the Discoverer.

    For the Discoverer component; you should move to Discoverer/config directory and you have to make a copy of sample_dbsat.config. The new copied file name must be named dbsat.config

    $ cp sample_dbsat.config dbsat.config

    Now edit dbsat.config file which is used by the Discoverer component to connect to the database (Picture-9)


    picture-9.JPG

    (Picture-9)

    In the same directory; open the sensitive.ini file  to define sensitive data in the database ( Picture-10)

    picture-10.JPG

    (Picture-10)

    Now we can start the Discoverer component whit the below command ( Picture-11)


    picture-11.JPG

    (Picture-11)

    The Database Sensitive Assessment Report can be found in the dbsat directory with the name you entered in the command. In this example the file name is DB3_file_report.html.

    The Database Sensitive Report is shown in the picture-12.

    picture-12.JPG


    In this note; I gave a quick tour about the new version of DBSAT. If you want to get full explanation about this product; you should visit to

    http://www.oracle.com/technetwork/database/security/dbsat/overview/index.html

    As a result; In the times of data theft, this product will help you to identify the vulnerabilities of your databases. Therefore; It can be good starting point to secure your databases.

    Y. Anıl Akduygu from Istanbul/Turkey.

     
  • Anıl Akduygu 16:37 on 16 March 2019 Permalink | Reply
    Tags: , , , , SQL Server 2016   

    Windows Server 2016 Installation on Oracle VM Virtual Box 

    In this note; I will show you how you can install Windows server 2016 on Oracle VM Virtual Box step by step. Actually all my notes about database security. But I will use this server to show you some security feature of SQL Server.

    1. First; you have create a blank Windows machine by Oracle VM Virtual Box Manager by clicking New in Machine menu.


    1

    2.In the dialog box give a name for the virtual machine and choose Windows 2016 (64bit) as a version.


    2

    3. Now ; select the machine RAM , I chose 2 GB as you see in the picture below.

    3

    4. After pressing Next; you will come to Hard Disk configuration page;  in my machine I decided to create a virtual disk.

    4

    5. Choose VDI as a hard disk type.

    5

    6. In the Storage on physical hard disk page choose your disk type and I chose dynamically allocated disk

    6

    7. In File location and size page;  choose you hard disk size and location and press the Create button to create a blank machine. Now you blank Windows 2016 server is ready.


    7


    8. Now It is the time to download Windows 2016 Server ISO from Microsoft support page.

    8

    9. After downloading ISO page ; insert this file into previously created blank machine. You can do this from the setting page of the machine , choose storage section and Optical Drive part.

    9

    10. Now start the machine and press Install Now.

    10.JPG

    11. Choose Windows Server 2016 Standart Evaluation ( Desktop Experience)

    11.JPG

    12. This is a new installation for this reason ; choose Custom install

    13.JPG

    13. Now create you disk drive ; just choose Drive 0 and press Next.

    13.JPG

    14.  Windows installation starts and you have to wait for a while

    14.JPG

    15.  At the and you should enter your Administration password and you have make some regional setting.

    15.JPG

    16. And now you virtual Windows 2016 server is ready you can open your desktop by pressing   Ctrl-Alt-Del from Input – keyboard menu .

    16.jpg


    I hope this note will be helpful for you.

    Y. Anil Akduygu from Istanbul

     
c
Compose new post
j
Next post/Next comment
k
Previous post/Previous comment
r
Reply
e
Edit
o
Show/Hide comments
t
Go to top
l
Go to login
h
Show/Hide help
shift + esc
Cancel