Tagged: database Toggle Comment Threads | Keyboard Shortcuts

  • Anıl Akduygu 21:07 on 26 October 2016 Permalink | Reply
    Tags: database, , , , , , ,   

    How to find hidden granted roles at Oracle Database 

    This is very critical issue to find hidden granted roles to any user. For example If you want to find users whose have granted DBA roles.Normally , you can use below query at your database

    SELECT GRANTEE, GRANTED_ROLE   FROM DBA_ROLE_PRIVS

    WHERE GRANTED_ROLE=’DBA’

    AND GRANTEE NOT IN (‘SYS’,’SYSTEM’);

    But this kind of search does not show DBA users all time.

    Lets give an example ;

    We have an user named  appuser03 and we have two roles;  admin_role and admin_role01

    Now ; give DBA grant to admin_role01 and assign   admin_role01 to admin_role and at the end assign admin_role to appuser03;

    Let’s show it;

    SQL> create role admin_role01;

    Role created.

    SQL> create role admin_role;

    Role created.

    SQL> grant dba to admin_role01;

    Grant succeeded.

    SQL> grant admin_role01 to admin_role;

    Grant succeeded.

    SQL> grant admin_role to appuser03;

    Grant succeeded.

    Now check the DBA users at your database;

    SQL>

    SELECT GRANTEE, GRANTED_ROLE
    FROM DBA_ROLE_PRIVS
    WHERE GRANTED_ROLE=’DBA’
    AND GRANTEE NOT IN (‘SYS’,’SYSTEM’);

    GRANTEE                GRANTED_ROLE
    ————       —————–
    ADMIN_ROLE01     DBA

    As you see;  you can not see that APPUSER03 have DBA grant you still you have to make investigation about Admin_role01 to find APPUSER03 have DBA grant.

    Instead use hierarchical  queries ; like this

    SELECT DISTINCT a.grantee , granted_role
    FROM
    (
    SELECT DISTINCT LEVEL level_deep, grantee, granted_role
    FROM dba_role_privs
    START WITH granted_role = ‘DBA’
    CONNECT BY PRIOR grantee = granted_role ) a, dba_users b
    WHERE a.GRANTEE = b.USERNAME AND
    b.USERNAME NOT IN (‘SYSTEM’,’SYS’) AND
    b.ACCOUNT_STATUS = ‘OPEN’

    GRANTEE            GRANTED_ROLE
    ——————– ——————–
    APPUSER03          ADMIN_ROLE

    Bingo, at this query you can find that APPUSER03 have DBA role via ADMIN_ROLE role. Simply  you should revoke ADMIN_ROLE from APPUSER03 .

    By hierarchical queries ; you can see which roles are granted to other roles.

    The hierarchy of granted roles are shown below.

    SQL>

    SELECT DISTINCT LEVEL level_deep, grantee,granted_role
    FROM  dba_role_privs WHERE grantee NOT in (‘SYS’,’SYSTEM’)
    START WITH granted_role = ‘DBA’
    CONNECT BY PRIOR grantee = granted_role
    ORDER BY level_deep desc

    LEVEL_DEEP   GRANTEE        GRANTED_ROLE
    ----------  -----------     --------------------
     3          APPUSER03        ADMIN_ROLE
     2          ADMIN_ROLE       ADMIN_ROLE01
     1          ADMIN_ROLE01     DBA


    You can use this query to find other granted system roles like EXP_FULL_DATABASE or IMP_FULL_DATABASE ..

    See you on the next note.

    Anil Akduygu.


  • Anıl Akduygu 17:18 on 30 September 2016 Permalink | Reply
    Tags: database, ,   

    My Book About Oracle Database Security 

    My book about the Oracle Database security “ORACLE VERİTABANI GÜVENLİĞİ” is on the sale. You can find it D&R stores at Turkey. At the web;  you can get it from ABAKUS bookstore Web-site.

    http://www.abakuskitap.com/oracle-veritabani-guvenligi

    This book is about general Oracle database security and includes Oracle 11g and Oracle 12c  versions. It is a Turkish book.


    oracle_guvenlik

    Main Topics on the book

    • Oracle User Management
    • Enterprise User Security
    • Secure External Password Store
    • Authorization
    • Privilege Analysis
    • Application Context
    • Virtual Private Database
    • Security at Oracle Container Databases
    • Data Reduction
    • Auditing
    • New Security Features at Oracle 12c
    • Transperant Data Reduction
    • Encryption on the network
    • Security for Network Services


    oracle_guvenlik-1

    If you are interested to translate it to Engish , Please Contact to me.


    Anıl Akduygu


    yusufanilakduygu@gmail.com

     
  • Anıl Akduygu 11:22 on 22 September 2016 Permalink | Reply
    Tags: database, , , ,   

    HOW TO UNINSTALL ORACLE DB VAULT 


    At this note; I will show you How you can uninstall DB vault from an Oracle 11g R2 database. This can be necessary for many reasons.

    For example When  you do not want to use DB Vault option at  your  database you can decide to completely uninstall  DB Vault option.

    Sometimes during installation there can be some problems and your installation halts at the middle. After solving the problem at the database, you need to uninstall uncompleted installation.


    Configuratin is like this;

    Host : Oracle Linux 6

    Database : Oracle 11g R2 ( 11.2.0.4)


    Now we can start to uninstall

    Check the DB Vault is already installed first

    SQL> column parameter format a40

    SQL> column value format a10


    SQL> Select parameter, value from v$option where parameter in (‘Oracle Database Vault’,’Oracle Label Security’);


    PARAMETER                         VALUE

    ————————————- ———-

    Oracle Label Security                   TRUE

    Oracle Database Vault                   TRUE


    Shutdown database and Stop listener


    sqlplus / as sysdba

    SQL> shutdown immediate

    Database closed.

    Database dismounted.

    ORACLE instance shut down.


    oracle@localhost admin]$ lsnrctl stop


    LSNRCTL for Linux: Version 11.2.0.4.0 – Production on 22-SEP-2016 10:52:39

    Copyright (c) 1991, 2013, Oracle.  All rights reserved.

    Connecting to (DESCRIPTION=(ADDRESS=(PROTOCOL=TCP)(HOST=10.0.2.15)(PORT=1521)))

    The command completed successfully

    If you have Database Control; stop it as well.

    Unlink Oracle Label Security


    This operation is not necessary ; If you want to use Oracle Label Security you can kip this step


    [oracle@localhost admin]$ chopt disable lbac


    Writing to /u01/app/oracle/product/11.2.0/db_1/install/disable_lbac.log…

    /usr/bin/make -f /u01/app/oracle/product/11.2.0/db_1/rdbms/lib/ins_rdbms.mk lbac_off ORACLE_HOME=/u01/app/oracle/product/11.2.0/db_1

    /usr/bin/make -f /u01/app/oracle/product/11.2.0/db_1/rdbms/lib/ins_rdbms.mk ioracle ORACLE_HOME=/u01/app/oracle/product/11.2.0/db_1


    Unlink Oracle Database Vault


    [oracle@localhost admin]$ chopt disable dv

    Writing to /u01/app/oracle/product/11.2.0/db_1/install/disable_dv.log…

    /usr/bin/make -f /u01/app/oracle/product/11.2.0/db_1/rdbms/lib/ins_rdbms.mk dv_off ORACLE_HOME=/u01/app/oracle/product/11.2.0/db_1

    /usr/bin/make -f /u01/app/oracle/product/11.2.0/db_1/rdbms/lib/ins_rdbms.mk ioracle ORACLE_HOME=/u01/app/oracle/product/11.2.0/db_1


    [oracle@localhost admin]$

    Start Database and listeners


    [oracle@localhost admin]$ sqlplus / as sysdba

    SQL*Plus: Release 11.2.0.4.0 Production on Thu Sep 22 10:56:23 2016

    Copyright (c) 1982, 2013, Oracle.  All rights reserved.

    Connected to an idle instance.

    SQL> startup

    ORACLE instance started.

    Total System Global Area 1653518336 bytes

    Fixed Size            2253784 bytes

    Variable Size           1056967720 bytes

    Database Buffers    587202560 bytes

    Redo Buffers                7094272 bytes

    Database mounted.

    Database opened.


    [oracle@localhost ~]$ lsnrctl start


    Listening Endpoints Summary…

    (DESCRIPTION=(ADDRESS=(PROTOCOL=tcp)(HOST=10.0.2.15)(PORT=1521)))

    Services Summary…

    Service “DB11G” has 1 instance(s).

    Instance “DB11G”, status UNKNOWN, has 1 handler(s) for this service…

    The command completed successfully

    Find the users who have  DV_OWNER and DV_ACCTMGR roles;


    SQL> select unique GRANTEE from dba_role_privs

    where GRANTED_ROLE in (‘DV_ACCTMGR’,’DV_OWNER’)

     and grantee <> ‘DVSYS’;


    GRANTEE

    ——————————

    DVOWNER

    DVACCTMNGR


    Turn OFF  recyclebin   and rebound the database


    SQL> conn / as sysdba

    Connected.


    SQL> alter system set recyclebin=off scope=spfile;

    System altered.

    SQL> startup force

    ORACLE instance started.

    Total System Global Area 1653518336 bytes

    Fixed Size            2253784 bytes

    Variable Size           1056967720 bytes

    Database Buffers    587202560 bytes

    Redo Buffers                7094272 bytes

    Database mounted.

    Database opened.


    Run dvremov.sql

    SQL> conn / as sysdba

    Connected.

    start  ?/rdbms/admin/dvremov.sql


    .

    .

    .

     PL/SQL procedure successfully completed.


    Manually drop DV_OWNER and DV_ACCTMNGR users


    conn / as sysdba

    SQL> drop user  DVACCTMNGR cascade;

    User dropped.

    SQL> drop user  DVACCTMNGR cascade;

    User dropped.


    Turn on recyclebin  and restart the database

    conn / as sysdba

    alter system set recyclebin=on scope=spfile;


    Check DB Vault Option


    SQL> column parameter format a40

    SQL> column value format a10

    SQL> Select parameter, value from v$option where parameter in (‘Oracle Database Vault’,’Oracle Label Security’);


    PARAMETER                    VALUE

    ——————————- ———-

    Oracle Label Security              FALSE

    Oracle Database Vault              FALSE


    Now Oracle DB Vault option is uninstalled from your database. If you want you can install it cleanly.


    At this note ; I showed uninstallation of Oracle DB Vault  for Oracle 11g R2 database . For other versions there can be small differences. You can find all detailed information at the Metalink note.

    How To Uninstall Or Reinstall Database Vault in 11g (Doc ID 803948.1)

    Thanks Anıl Akduygu.


  • Anıl Akduygu 18:14 on 15 August 2016 Permalink | Reply
    Tags: database, , metasploit framework, , oracle client, , ruby,   

    Using Oracle exploits or Auxilaries from Metasploit Framework at Kali 

    At this note I will show you how you can use Oracle auxiliaries from Metasploit Framework.Because of copyright issues ; Oracle client is not pre-installed  Kali  virtual machine and therefore Oracle auxiliaries and exploits can not  be used without Oracle Client installation .

    For example try to use oraenum auxiliary ;

    sf > use auxiliary/admin/oracle/oraenum
    msf auxiliary(oraenum) > show options

    Module options (auxiliary/admin/oracle/oraenum):

    Name Current Setting Required Description
    —- ————— ——– ———–
    DBPASS TIGER yes The password to authenticate with.
    DBUSER SCOTT yes The username to authenticate with.
    RHOST yes The Oracle host.
    RPORT 1521 yes The TNS port.
    SID ORCL yes The sid to authenticate with.

    msf auxiliary(oraenum) > set SID DB11G

    msf auxiliary(oraenum) > set RHOST 192.200.11.9
    RHOST => 192.200.11.9
    msf auxiliary(oraenum) > run

    [-] Failed to load the OCI library: cannot load such file — oci8
    [-] Try ‘gem install ruby-oci8’
    [*] Auxiliary module execution completed
    msf auxiliary(oraenum) >

    As you see you are failed to load the OCI library error.

    Now we will install Oracle instant Client to Kali Linux machine and link it with metasploit Framework.

    1 . Download Oracle Instant Client to Kali machine

    First create necessary directories to install Oracle Instant Client.

    root@kali:~# mkdir /opt/oracle
    root@kali:~# cd /opt/oracle
    root@kali:/opt/oracle#

    Download Oracle Instant client to /opt/oracle directories from below link.

    http://www.oracle.com/technetwork/database/features/instant-client/index-097480.html

    I use Kali linux x86-64.

    1


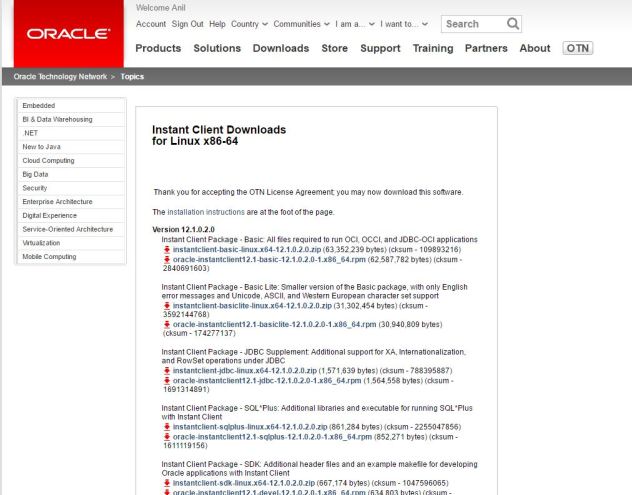
    you need to download  all these files to /opt/oracle directory.

    • instantclient-basic-linux-12.1.0.2.0.zip
    • instantclient-sqlplus-linux-12.1.0.2.0.zip
    • instantclient-sdk-linux-12.1.0.2.0.zip


    root@kali:/opt/oracle# pwd
    /opt/oracle
    root@kali:/opt/oracle# ls -lrt
    total 63364
    -rwxr-x— 1 root root 667174 Aug 6 04:36 instantclient-sdk-linux.x64-12.1.0.2.0.zip
    -rwxr-x— 1 root root 63352239 Aug 6 04:36 instantclient-basic-linux.x64-12.1.0.2.0.zip
    -rwxr-x— 1 root root 861284 Aug 6 04:36 instantclient-sqlplus-linux.x64-12.1.0.2.0.zip
    root@kali:/opt/oracle#


    2. Install Oracle Client

    Unzip the downloaded files and then make symlink operation.

    root@kali:/opt/oracle# pwd
    /opt/oracle
    root@kali:/opt/oracle# unzip instantclient-basic-linux.x64-12.1.0.2.0.zip

    root@kali:/opt/oracle# unzip instantclient-sqlplus-linux.x64-12.1.0.2.0.zip

    root@kali:/opt/oracle# unzip instantclient-sdk-linux.x64-12.1.0.2.0.zip

    root@kali:/opt/oracle# cd instantclient_12_1
    root@kali:/opt/oracle/instantclient_12_1#

    symlink the shared library

    root@kali:/opt/oracle/instantclient_12_1# ln libclntsh.so.12.1 libclntsh.so

    root@kali:/opt/oracle/instantclient_12_1# ls -lh libclntsh.so
    -rwxrwxr-x 2 root root 57M Jul 7 2014 libclntsh.so

    and set Environment variables

    export PATH=$PATH:/opt/oracle/instantclient_12_1
    export SQLPATH=/opt/oracle/instantclient_12_1
    export TNS_ADMIN=/opt/oracle/instantclient_12_1
    export LD_LIBRARY_PATH=/opt/oracle/instantclient_12_1
    export ORACLE_HOME=/opt/oracle/instantclient_12_1

    Now the Oracle client is ready ; Just check it

    root@kali:/opt/oracle/instantclient_12_1# sqlplus

    SQL*Plus: Release 12.1.0.2.0 Production on Sat Aug 6 04:45:07 2016

    Copyright (c) 1982, 2014, Oracle. All rights reserved.

    Enter user-name:

    As you see SQLplus is working. You are on the right way.

    3. Download the ruby gem

    Now  download and extract the gem source release:

    root@kali:~# cd /opt/oracle

    root@kali:/opt/oracle# wget https://github.com/kubo/ruby-oci8/archive/ruby-oci8-2.1.8.zip
    –2016-08-06 04:53:22– https://github.com/kubo/ruby-oci8/archive/ruby-oci8-2.1.8.zip
    Resolving github.com (github.com)… 192.30.253.112
    Connecting to github.com (github.com)|192.30.253.112|:443… connected.
    HTTP request sent, awaiting response… 302 Found
    Location: https://codeload.github.com/kubo/ruby-oci8/zip/ruby-oci8-2.1.8 [following]
    –2016-08-06 04:53:23– https://codeload.github.com/kubo/ruby-oci8/zip/ruby-oci8-2.1.8
    Resolving codeload.github.com (codeload.github.com)… 192.30.253.121
    Connecting to codeload.github.com (codeload.github.com)|192.30.253.121|:443… connected.
    HTTP request sent, awaiting response… 200 OK
    Length: unspecified [application/zip]
    Saving to: ‘ruby-oci8-2.1.8.zip’

    ruby-oci8-2.1.8.zip [ <=> ] 295.28K 547KB/s in 0.5s

    2016-08-06 04:53:24 (547 KB/s) – ‘ruby-oci8-2.1.8.zip’ saved [302365]


    Now unzip ruby gem,

    root@kali:/opt/oracle# pwd
    /opt/oracle
    root@kali:/opt/oracle# ls -lrt
    total 63664
    -rwxr-x— 1 root root 667174 Aug 6 04:36 instantclient-sdk-linux.x64-12.1.0.2.0.zip
    -rwxr-x— 1 root root 63352239 Aug 6 04:36 instantclient-basic-linux.x64-12.1.0.2.0.zip
    -rwxr-x— 1 root root 861284 Aug 6 04:36 instantclient-sqlplus-linux.x64-12.1.0.2.0.zip
    drwxr-xr-x 3 root root 4096 Aug 6 04:41 instantclient_12_1
    -rw-r–r– 1 root root 302365 Aug 6 04:53 ruby-oci8-2.1.8.zi

    root@kali:/opt/oracle# pwd
    /opt/oracle
    root@kali:/opt/oracle# ls -lrt
    total 63664
    -rwxr-x— 1 root root 667174 Aug 6 04:36 instantclient-sdk-linux.x64-12.1.0.2.0.zip
    -rwxr-x— 1 root root 63352239 Aug 6 04:36 instantclient-basic-linux.x64-12.1.0.2.0.zip
    -rwxr-x— 1 root root 861284 Aug 6 04:36 instantclient-sqlplus-linux.x64-12.1.0.2.0.zip
    drwxr-xr-x 3 root root 4096 Aug 6 04:41 instantclient_12_1
    -rw-r–r– 1 root root 302365 Aug 6 04:53 ruby-oci8-2.1.8.zip

    root@kali:/opt/oracle# unzip ruby-oci8-2.1.8.zip

    inflating: ruby-oci8-ruby-oci8-2.1.8/test/test_connection_pool.rb
    inflating: ruby-oci8-ruby-oci8-2.1.8/test/test_connstr.rb
    inflating: ruby-oci8-ruby-oci8-2.1.8/test/test_datetime.rb
    inflating: ruby-oci8-ruby-oci8-2.1.8/test/test_dbi.rb
    inflating: ruby-oci8-ruby-oci8-2.1.8/test/test_dbi_clob.rb
    inflating: ruby-oci8-ruby-oci8-2.1.8/test/test_encoding.rb
    inflating: ruby-oci8-ruby-oci8-2.1.8/test/test_error.rb
    inflating: ruby-oci8-ruby-oci8-2.1.8/test/test_metadata.rb
    inflating: ruby-oci8-ruby-oci8-2.1.8/test/test_object.rb
    inflating: ruby-oci8-ruby-oci8-2.1.8/test/test_oci8.rb
    inflating: ruby-oci8-ruby-oci8-2.1.8/test/test_oracle_version.rb
    inflating: ruby-oci8-ruby-oci8-2.1.8/test/test_oradate.rb
    inflating: ruby-oci8-ruby-oci8-2.1.8/test/test_oranumber.rb
    inflating: ruby-oci8-ruby-oci8-2.1.8/test/test_package_type.rb
    inflating: ruby-oci8-ruby-oci8-2.1.8/test/test_rowid.rb

    root@kali:/opt/oracle# ls -lrt
    total 63668
    drwxr-xr-x 7 root root 4096 Apr 4 2015 ruby-oci8-ruby-oci8-2.1.8
    -rwxr-x— 1 root root 667174 Aug 6 04:36 instantclient-sdk-linux.x64-12.1.0.2.0.zip
    -rwxr-x— 1 root root 63352239 Aug 6 04:36 instantclient-basic-linux.x64-12.1.0.2.0.zip
    -rwxr-x— 1 root root 861284 Aug 6 04:36 instantclient-sqlplus-linux.x64-12.1.0.2.0.zip
    drwxr-xr-x 3 root root 4096 Aug 6 04:41 instantclient_12_1
    -rw-r–r– 1 root root 302365 Aug 6 04:53 ruby-oci8-2.1.8.zip

    root@kali:/opt/oracle# cd ruby-oci8-ruby-oci8-2.1.8/
    root@kali:/opt/oracle/ruby-oci8-ruby-oci8-2.1.8#


    4. Install libgmp

    Install libgmp (needed to build the gem) and set the path

    root@kali:/opt/oracle# cd ruby-oci8-ruby-oci8-2.1.8/

    root@kali:/opt/oracle/ruby-oci8-ruby-oci8-2.1.8#

    Make an addition to PATH environment variable.

    # export PATH=/opt/metasploit/ruby/bin:$PATH

    root@kali:/opt/oracle/ruby-oci8-ruby-oci8-2.1.8# apt-get install libgmp-dev
    Reading package lists… Done
    Building dependency tree
    Reading state information… Done
    libgmp-dev is already the newest version (2:6.1.0+dfsg-2).
    libgmp-dev set to manually installed.
    0 upgraded, 0 newly installed, 0 to remove and 0 not upgraded.


    5. Build and install the gem

    root@kali:/opt/oracle/ruby-oci8-ruby-oci8-2.1.8# pwd
    /opt/oracle/ruby-oci8-ruby-oci8-2.1.8

    root@kali:/opt/oracle/ruby-oci8-ruby-oci8-2.1.8# make
    ruby -w setup.rb config
    setup.rb:280: warning: assigned but unused variable – vname
    setup.rb:280: warning: assigned but unused variable – desc
    setup.rb:280: warning: assigned but unused variable – default2
    —> lib
    —> lib/oci8
    <— lib/oci8
    —> lib/dbd
    <— lib/dbd
    <— lib
    —> ext
    —> ext/oci8
    /usr/bin/ruby2.2 /opt/oracle/ruby-oci8-ruby-oci8-2.1.8/ext/oci8/extconf.rb
    checking for load library path…
    LD_LIBRARY_PATH…
    checking /opt/oracle/instantclient_12_1… yes
    /opt/oracle/instantclient_12_1/libclntsh.so.12.1 looks like an instant client.
    checking for cc… ok
    checking for gcc… yes
    checking for LP64… yes
    checking for sys/types.h… yes
    checking for ruby header… ok
    checking for OCIInitialize() in oci.h… yes
    checking for Oracle 8.1.0 API – start
    checking for OCIEnvCreate()… yes
    checking for OCILobClose()… yes
    checking for OCILobCreateTemporary()… yes
    checking for OCILobFreeTemporary()… yes
    checking for OCILobGetChunkSize()… yes
    checking for OCILobIsTemporary()… yes
    checking for OCILobLocatorAssign()… yes
    checking for OCILobOpen()… yes
    checking for OCIMessageGet()… yes

    …….

    compiling object.c
    compiling apiwrap.c
    compiling encoding.c
    compiling oranumber_util.c
    compiling thread_util.c
    compiling plthook_elf.c
    compiling hook_funcs.c
    linking shared-object oci8lib_220.so
    make[1]: Leaving directory ‘/opt/oracle/ruby-oci8-ruby-oci8-2.1.8/ext/oci8’
    <— ext/oci8
    <— ext

    And then make install

    root@kali:/opt/oracle/ruby-oci8-ruby-oci8-2.1.8# pwd
    /opt/oracle/ruby-oci8-ruby-oci8-2.1.8
    root@kali:/opt/oracle/ruby-oci8-ruby-oci8-2.1.8# make install
    ruby -w setup.rb install
    setup.rb:280: warning: assigned but unused variable – vname
    setup.rb:280: warning: assigned but unused variable – desc
    setup.rb:280: warning: assigned but unused variable – default2
    —> lib
    mkdir -p /usr/local/lib/site_ruby/2.2.0/
    install oci8.rb /usr/local/lib/site_ruby/2.2.0/
    —> lib/oci8
    mkdir -p /usr/local/lib/site_ruby/2.2.0/oci8
    install compat.rb /usr/local/lib/site_ruby/2.2.0/oci8
    install encoding-init.rb /usr/local/lib/site_ruby/2.2.0/oci8
    install object.rb /usr/local/lib/site_ruby/2.2.0/oci8
    install bindtype.rb /usr/local/lib/site_ruby/2.2.0/oci8
    install ocihandle.rb /usr/local/lib/site_ruby/2.2.0/oci8
    install oracle_version.rb /usr/local/lib/site_ruby/2.2.0/oci8
    install connection_pool.rb /usr/local/lib/site_ruby/2.2.0/oci8
    install encoding.yml /usr/local/lib/site_ruby/2.2.0/oci8
    install properties.rb /usr/local/lib/site_ruby/2.2.0/oci8
    install datetime.rb /usr/local/lib/site_ruby/2.2.0/oci8
    install cursor.rb /usr/local/lib/site_ruby/2.2.0/oci8
    install oci8.rb /usr/local/lib/site_ruby/2.2.0/oci8
    install metadata.rb /usr/local/lib/site_ruby/2.2.0/oci8
    <— lib/oci8
    —> lib/dbd
    mkdir -p /usr/local/lib/site_ruby/2.2.0/dbd
    install OCI8.rb /usr/local/lib/site_ruby/2.2.0/dbd
    <— lib/dbd
    <— lib
    —> ext
    —> ext/oci8
    mkdir -p /usr/local/lib/x86_64-linux-gnu/site_ruby/.
    install oci8lib_220.so /usr/local/lib/x86_64-linux-gnu/site_ruby/.
    <— ext/oci8
    <— ext

    Now Try Oracle Auxiliary one more time

    root@kali:/opt/oracle/ruby-oci8-ruby-oci8-2.1.8# msfconsole

    msf > use auxiliary/admin/oracle/oraenum
    msf auxiliary(oraenum) > set SID DB11G
    SID => DB11G
    msf auxiliary(oraenum) > set RHOST 192.200.11.9
    RHOST => 192.200.11.9
    msf auxiliary(oraenum) > run

    [*] Running Oracle Enumeration….
    [*] The versions of the Components are:
    [*] Oracle Database 11g Enterprise Edition Release 11.2.0.4.0 – 64bit Production
    [*] PL/SQL Release 11.2.0.4.0 – Production
    [*] CORE 11.2.0.4.0 Production
    [*] TNS for Linux: Version 11.2.0.4.0 – Production
    [*] NLSRTL Version 11.2.0.4.0 – Production
    [*] Auditing:
    [*] Database Auditing is enabled!
    [*] Auditing of SYS Operations is not enabled!
    [*] Security Settings:
    [*] SQL92 Security restriction on SELECT is not Enabled
    [*] UTL Directory Access is set to
    [*] Audit log is saved at /u01/app/oracle/admin/DB11G/adump
    [*] Password Policy:
    [*] Current Account Lockout Time is set to 1
    [*] The Number of Failed Logins before an account is locked is set to 10
    [*] The Password Grace Time is set to 7
    [*] The Lifetime of Passwords is set to 180
    [*] The Number of Times a Password can be reused is set to UNLIMITED
    [*] The Maximum Number of Times a Password needs to be changed before it can be reused is set to UNLIMITED
    [*] The Number of Times a Password can be reused is set to UNLIMITED
    [*] Password Complexity is not checked
    [*] Active Accounts on the System in format Username,Password,Spare4 are:
    [*] SYS,8A8F025737A9097A,S:4F2AD836742BF4940F8635AF7A23A693069E17C38FB4EB2AAEAF55EA7F07
    [*] SYSTEM,2D594E86F93B17A1,S:9AAE92874C63DBC5C43CBC2A37E0C98EAEA902912442EB11BB10070F4102
    [*] SCOTT,F894844C34402B67,S:046017C46BF9B45D20FE1F7746FF2346B1185F3F38CCAF3BA5526385828B
    [*] USER001,98AD9BF0E3417534,S:D0C57D9B1BB122E8D3B532DFFDB8F65D02DECD724C7A0D2A98AAC28045DF
    [*] Expired or Locked Accounts on the System in format Username,Password,Spare4 are:
    [*] OUTLN,4A3BA55E08595C81,S:9D0352F4707B0EEF41811E091AF4731E609EDFDD80ABD412B06B2A257529
    [*] DIP,CE4A36B8E06CA59C,S:ADE7608F962BD12FE8A6564AA3E96EDA88FB9F2F11B79DCAE28AB902380C
    [*] ORACLE_OCM,5A2E026A9157958C,S:E9F3700D7530A6F79F0C5A635B50BCB76F8C18D99D2B9331CEA52B8796A1
    [*] DBSNMP,E066D214D5421CCC,S:3F2E9D45692FBD03D26B4EFC38A5461E8713636BB0F768500938D10EC563
    [*] APPQOSSYS,519D632B7EE7F63A,S:5E6B6A62DE6FEF350B2C972B1B46126333BF4C37057D8EEF7FDF45ABA6C3
    [*] WMSYS,7C9BA362F8314299,S:55E4A57548366A8A27A9CAA4CFE3877D645EDC790B699F809CB4B7C2493D
    [*] XS$NULL,,S:000000000000000000000000000000000000000000000000000000000000
    [*] EXFSYS,33C758A8E388DEE5,S:36D11106A9E7FBC3289C7683EA8


    As you see It works

    Do not forget to put all of these to .bashrc file

    export PATH=$PATH:/opt/oracle/instantclient_12_1
    export SQLPATH=/opt/oracle/instantclient_12_1
    export TNS_ADMIN=/opt/oracle/instantclient_12_1
    export LD_LIBRARY_PATH=/opt/oracle/instantclient_12_1
    export ORACLE_HOME=/opt/oracle/instantclient_12_1export PATH=/opt/metasploit/ruby/bin:$PATH

     
  • Anıl Akduygu 10:24 on 6 August 2016 Permalink | Reply
    Tags: , database, , , , , ,   

    DB Vault Installation to Oracle 12c Container Database 

    12c-architecture

    At my latest post I talked about Oracle DB Vault Installation to Oracle 12c non-container database. At this post I want to show you how you can install  Oracle DB Vault to Oracle 12c Container database.

    Actually the task is very similar. But for the container databases; you should first install the root database; and then you can install to any pluggable database.

    To continue this post ; you should have basic knowledge about Oracle Container databases.

    https://oracle-base.com/articles/12c/multitenant-overview-container-database-cdb-12cr1

    Before stating installation process; I wil show you my configuration

    Host : Oracle 7 Linux

    DB : Oracle 12c  12.1.0.2.0 with two pluggable databases  pdb1 and pdb2 and the database name is CDB3

    During the installation I will connect to  the root container and pluggable  database by using below tns settings. As you know when you create a pluggable database a service is created by the name of pluggable database automatically.

    at your tnsnames.ora file there should be tns entries   like that;
    CDB3 =
    (DESCRIPTION =
    (ADDRESS = (PROTOCOL = TCP)(HOST = 192.200.11.9)(PORT = 1521))
    (CONNECT_DATA =
    (SERVER = DEDICATED)
    (SERVICE_NAME = CDB3)
    )
    )

    pdb1 =
    (DESCRIPTION =
    (ADDRESS = (PROTOCOL = TCP)(HOST = 192.200.11.9)(PORT = 1521))
    (CONNECT_DATA =
    (SERVER = DEDICATED)
    (SERVICE_NAME = pdb1)
    )
    )

    pdb2 =
    (DESCRIPTION =
    (ADDRESS = (PROTOCOL = TCP)(HOST = 192.200.11.9)(PORT = 1521))
    (CONNECT_DATA =
    (SERVER = DEDICATED)
    (SERVICE_NAME = pdb2)
    )
    )

    at this post; first I will install DB vault to root container and then pdb1 pluggable database.

    Installing DB Vault to root container

    1.  First check If DB Vault is alreday installed
    SQL> connect SYSTEM@CDB3
    Enter password:
    Connected.
    SQL> show con_name

    CON_NAME
    ——————————
    CDB$ROOT
    SQL> column parameter format a25
    SQL> column value format a10
    SQL> SELECT parameter,value FROM gv$OPTION WHERE PARAMETER in
    2 ( ‘Oracle Database Vault’,’Oracle Label Security’);

    PARAMETER VALUE
    ————————- ———-
    Oracle Label Security FALSE
    Oracle Database Vault FALSE

    After DBVault installation all these values become TRUE


    2. Take  copy of some views about privileges;

    At the SYSTEM user take some copy of privilege views at the root container. To compare privileges after DB vault installation.

    SQL> create table a_cdb_network_acls as select * FROM cdb_network_acls;

    Table created.

    SQL> create table a_cdb_network_acl_privileges as select * from cdb_network_acl_privileges;

    Table created.

    SQL> create table a_cdb_tab_privs as Select * from cdb_tab_privs;

    Table created.

    SQL> create table a_cdb_sys_privs as Select * from cdb_sys_privs;

    Table created.

    SQL> create table a_cdb_role_privs as Select * from cdb_role_privs;

    Table created.

    SQL> create table a_cdb_objects as select owner,object_name,object_type from cdb_objects where status=’INVALID’ and object_type <> ‘SYNONYM’ ;

    Table created.

    SQL> create table a_cdb_registry as select * from cdb_registry;

    Table created.

    SQL>

    3. Create DV Owner and DV  Account Manager User

    DV owner user administers  DB Vault and DV Account Manager user administers all Oracle users. Because of the separation of duties these two users must be different.

    for container databases we create common users .

    connect sys as sysdba
    SQL> create user c##dvowner identified by oracle CONTAINER=ALL;

    User created.

    SQL> create user c##dvacctmngr identified by oracle CONTAINER=ALL;

    User created.

    SQL> grant SET CONTAINER,CREATE SESSION to c##dvowner;

    Grant succeeded.

    SQL> grant SET CONTAINER,CREATE SESSION to c##dvacctmngr;

    Grant succeeded.

    4. Configure DB Vault

    SQL>
    SQL> BEGIN
    2 DVSYS.CONFIGURE_DV (
    3 dvowner_uname => ‘c##dvowner’,
    4 dvacctmgr_uname => ‘c##dvacctmngr’);
    5 END;
    6 /

    PL/SQL procedure successfully completed

    And compile invalid objects

    @?/rdbms/admin/utlrp.sql

    …Database user “SYS”, database schema “APEX_040200”, user# “98” 16:45:10
    …Compiled 0 out of 3014 objects considered, 0 failed compilation 16:45:10
    …271 packages
    …263 package bodies
    …452 tables
    …11 functions
    …16 procedures
    …3 sequences
    …457 triggers
    …1320 indexes
    …211 views
    …0 libraries
    …6 types
    …0 type bodies
    …0 operators
    …0 index types
    …Begin key object existence check 16:45:10
    …Completed key object existence check 16:45:11
    …Setting DBMS Registry 16:45:11
    …Setting DBMS Registry Complete 16:45:11
    …Exiting validate 16:45:11

    PL/SQL procedure successfully completed.

    5. Enable DB Vault

    SQL> connect c##dvowner
    Enter password:
    Connected.
    SQL> show con_name

    CON_NAME
    ——————————
    CDB$ROOT
    SQL> EXEC DBMS_MACADM.ENABLE_DV;

    PL/SQL procedure successfully completed.

    SQL> commit;

    Commit complete.

    6. Resart the Database 

    Bingo DB Vault is ready now at container database.

    SQL> connect sys as sysdba
    Enter password:
    Connected.

    SQL> startup force
    ORACLE instance started.

    Total System Global Area 977272832 bytes
    Fixed Size 2931520 bytes
    Variable Size 645924032 bytes
    Database Buffers 322961408 bytes
    Redo Buffers 5455872 bytes
    Database mounted.
    Database opened.

    SQL> alter pluggable database all open;

    Pluggable database altered.
    SQL> column parameter format a25
    SQL> column value format a10
    SQL> SELECT parameter,value FROM gv$OPTION WHERE PARAMETER in
    2 ( ‘Oracle Database Vault’,’Oracle Label Security’);

    PARAMETER VALUE
    ————————- ———-
    Oracle Label Security TRUE
    Oracle Database Vault TRUE


    Now our aim is to install Db Vault one of the our pluggable database. For the demonstration I will install DB Vault to PDB1 pluggable database.

    7. Give grants common users to connect PDB1


    SQL> connect sys@pdb1 as sysdba
    Enter password:
    Connected.
    SQL> show con_name

    CON_NAME
    ——————————
    PDB1
    SQL> grant SET CONTAINER,CREATE SESSION to c##dvowner;

    Grant succeeded.

    SQL> grant SET CONTAINER,CREATE SESSION to c##dvacctmngr;

    Grant succeeded.

    8. Configure DB Vault at PDB1

    SQL> connect sys@pdb1 as sysdba
    Enter password:
    Connected.
    SQL> show con_name

    CON_NAME
    ——————————
    PDB1

    SQL> BEGIN
    2 DVSYS.CONFIGURE_DV (
    3 dvowner_uname => ‘c##dvowner’,
    4 dvacctmgr_uname => ‘c##dvacctmngr’);
    5 END;
    6 /

    PL/SQL procedure successfully completed.

    SQL> commit;

    Commit complete.

    now compile invalid objects

    @?/rdbms/admin/utlrp.sql

    …Database user “SYS”, database schema “APEX_040200”, user# “98” 16:59:40
    …Compiled 0 out of 3014 objects considered, 0 failed compilation 16:59:41
    …271 packages
    …263 package bodies
    …452 tables
    …11 functions
    …16 procedures
    …3 sequences
    …457 triggers
    …1320 indexes
    …211 views
    …0 libraries
    …6 types
    …0 type bodies
    …0 operators
    …0 index types
    …Begin key object existence check 16:59:41
    …Completed key object existence check 16:59:41
    …Setting DBMS Registry 16:59:41
    …Setting DBMS Registry Complete 16:59:41
    …Exiting validate 16:59:41

    PL/SQL procedure successfully completed.

    8. Enable DB Vault at PDB1


    SQL> connect c##dvowner@pdb1
    Enter password:
    Connected.
    SQL> EXEC DBMS_MACADM.ENABLE_DV;

    PL/SQL procedure successfully completed.

    SQL> commit;

    Commit complete


    9. Restart PDB1 pluggable database

    SQL> startup force;
    ORACLE instance started.

    Total System Global Area 977272832 bytes
    Fixed Size 2931520 bytes
    Variable Size 645924032 bytes
    Database Buffers 322961408 bytes
    Redo Buffers 5455872 bytes
    Database mounted.
    Database opened.
    SQL> alter pluggable database all open;

    Pluggable database altered.


    Now DB Vault is intalled to PD1 pluggable database


    • Tiffany Szeto 19:44 on 27 January 2020 Permalink | Reply

      I found this document very useful. Just a couple questions: don’t you have to grant DV_ACCTMGR and
      DV_OWNER roles to these newly created accounts?

      Like

c
Compose new post
j
Next post/Next comment
k
Previous post/Previous comment
r
Reply
e
Edit
o
Show/Hide comments
t
Go to top
l
Go to login
h
Show/Hide help
shift + esc
Cancel